
|
Do it yourself
| |||
| ||||


Volkswagen Golf - Video tutorial
Model: Volkswagen Golf
Golf 4, MK 4, Golf IV
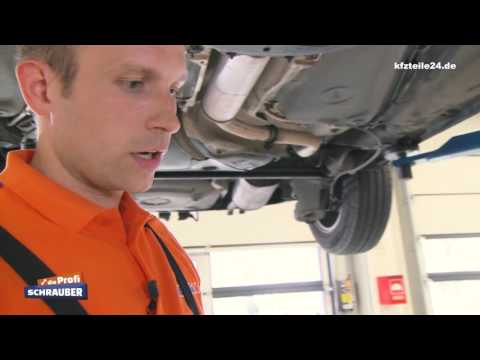
- Years 1997-2003 The information provided in this guide will show us how to dismantle and replace the lambda probe of the Volkswagen Golf. First, we lift the vehicle and start by removing the cover of the electrical connector of the probe, in order to disconnect it. Then, we use a wrench to unscrew our lambda probe or oxygen sensor, as shown in the video. At this point, we install the new lambda probe, as well as the original one, screwing it in by hand and then tightening it with a wrench. We make the electrical connection and reassemble the lower box, following the video tutorial until the end!
Posted on 13 February 2024 by ScegliAuto
 Lambda probe replacement on Golf 4 Variant
Volkswagen Golf (1997-2003 / Golf 4, MK 4, Golf IV) Do we want to replace the Lambda probe from a Golf 4 Variant? Let's see how the operating probe is disassembled. We lift the vehicle with the column  Replace Volkswagen Golf 4 lambda probe
Volkswagen Golf (1997-2003 / Golf 4, MK 4, Golf IV) In this video tutorial we will show you how to replace the lambda probe on the Volkswagen Golf fourth series. First we remember to disconnect the bat  Location and description of fuses on Volkswagen Golf 5
Volkswagen Golf (2003-2008 / Golf V, MK 5, Golf 5) The first fuse box is located inside the passenger compartment and more precisely in the front and side dashboard on the driver's side, which can be |
How do I replace the Land Rover Evoque auxiliary battery?
In order to replace the auxiliary battery of the Land Rover Evoque, it is necessary to go inside the passenger compartment and remove the panel which is positioned immediately under the glovebox. Once the screws that secure this panel have been loosened, it will be possible to access the components located in its rear part, including the auxiliary battery. The latter must be disconnected from its cables and the fixing screws must be loosened. The battery can then be replaced with a new one and the panel can be fixed again with its screws. by ScegliAuto More videos
|
|
For advertising on this site Write to info@scegliauto.com
ScegliAuto is not responsible for any inaccuracy of the data in the lists. To report any inaccuracy or your business (if you own the business in question), please write to info@scegliauto.com
Number of seconds to generate the page: 0.023
(c) ScegliAuto 2024 - info@scegliauto.com - Privacy Policy VAT number: IT01247470535 |