
|
Do it yourself
| |||
| ||||


Model: Yamaha Fzs
To set the time on a Yamaha FZS, start by turning on the motorcycle and make sure the dashboard is on. Use the button on the right handlebar switch to navigate through the settings menu until you find the option for the time. Once the time option is selected, you may need to press the button to confirm the selection or to enter the submenu. Once inside the time menu, use the buttons to set the correct time. Make sure to also select the correct format (24-hour or 12-hour). When you have set the desired time, confirm the selection and exit the settings menu. Verify that the time displayed on the dashboard matches the one you have set. If the time has been set correctly, the process is complete. If you encounter difficulties during the process, refer to the owner's manual of your Yamaha FZS for detailed instructions on how to set the time.
Posted on 12 May 2024 by ScegliAuto
 How to set the time on a Yamaha FZS?
Fzs To set the time on a Yamaha FZS, start by turning on the motorcycle and make sure the dashboard is on. Use the button on the right handlebar switch t 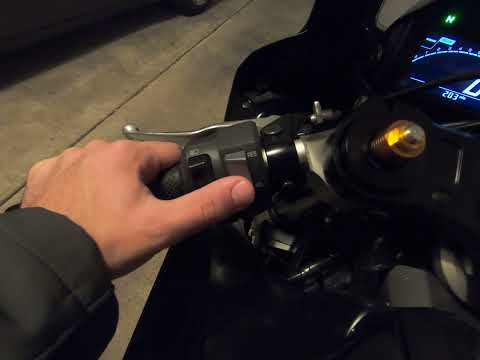 How to set the time on the Yamaha R7?
R7 In this tutorial, we can see how to adjust the time on the Yamaha R7, an extremely simple and fast operation to be carried out, for example, after re 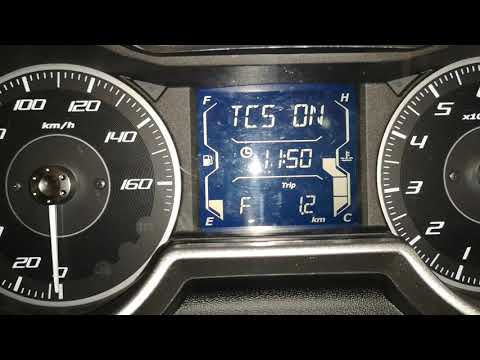 How to set the time on the Yamaha X-Max
X Max To set the time on the Yamaha Xmax scooter, you can follow these steps: Make sure the scooter is turned on and the display is on. Find the "MODE" but |
How to remove the stator of the Peugeot Speedfight 2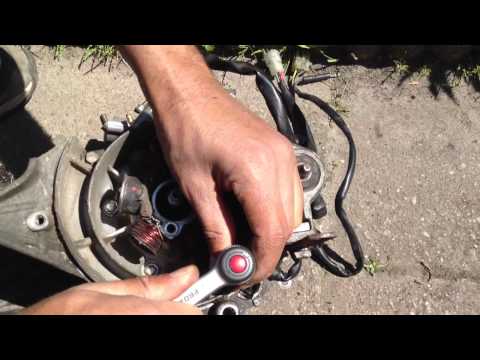
Today we will see, in this video tutorial, how to disassemble and replace the stator of the Peugeot Speedfight 2 scooter, following these simple steps. In this case, the disassembly operation is carried out with the engine removed from the bodywork; then, once the rotor has been removed, we can go and unscrew the fixing screws of the stator, in order to remove it from the engine casing together with the electrical wiring, as shown in the video. At this point we are going to replace the component with the new one, with the original spare part; we install the stator in the correct direction, finally adjusting the advance. by ScegliAuto More videos
|
|
For advertising on this site Write to info@scegliauto.com
ScegliAuto is not responsible for any inaccuracy of the data in the lists. To report any inaccuracy or your business (if you own the business in question), please write to info@scegliauto.com
Number of seconds to generate the page: 0.051
(c) ScegliAuto 2024 - info@scegliauto.com - Privacy Policy VAT number: IT01247470535 |