
|
Do it yourself
| |||
| ||||


Head gasket replacement
Model: Nissan Tino
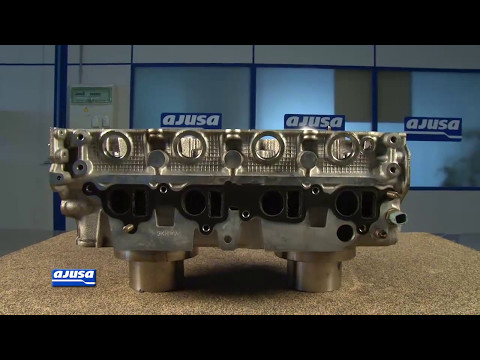
- Years 2000-2006 When replacing the cylinder head gasket, it is good practice to replace all gaskets, oil seals, rubber rings and special nuts and bolts when assembling the engine itself; start by checking the perfect flatness of the head surface after grinding using a threaded bar and a thickness gauge (the same check must be performed on the cylinder base); replace the valve guide rubbers using the special arc clamp to compact the return spring and be able to remove the valves: carefully clean the seat of the rubbers and lubricate when installing the new rubbers; apply the new intake manifold gasket and install the manifold itself by tightening the fixing nuts with the torque wrench; before inserting the new gasket and then the cylinder head, rework the threads of the fixing holes, check the interference of the pistons with the crankcase, apply the centering bushings and position the new gasket and the cylinder head using a new set of pins for the locking to which copper grease is applied to the bottom of the thread and immediately under the head; then tighten the fixing pins of the cylinder head according to a crossed type scheme and using both the dynamometric and the graduated wrench; then install the tappet cover with the new gasket, applying gasket mastic only in correspondence with the steps; finally fix the turbine to the exhaust manifold and the manifold itself to the head.
Posted on 17 August 2023 by ScegliAuto
 Intake manifold gasket replacement
Nissan Tino (2000-2006 / ) The gasket kit of the smeriglio series also includes the gasket of the intake manifold: after having carefully cleaned the gasket seats, both on the 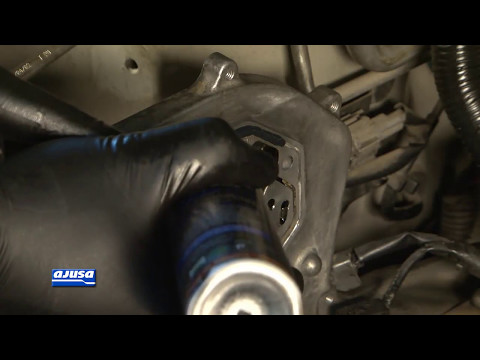 Guide on how to replace the cylinder head gasket
Nissan Tino (2000-2006 / ) The cylinder head gasket is interposed between the cylinder and the cylinder head to ensure that oil, combustion fumes and coolant do not come into c 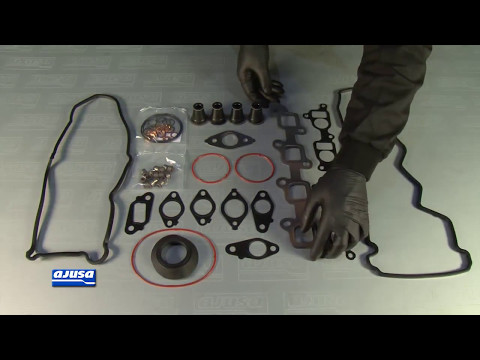 Replacement exhaust manifold gasket
Nissan Tino (2000-2006 / ) First of all, it is suggested to carry out this maintenance with a cold engine since elements which, in contact with the exhaust gases, reach high te Other guides that may interest you
|
How to set the time of the new Vespa 2023
In our new mini guide dedicated to your new Vespa 2023, we'll find out how to manually change the time displayed on the central console display. So first place your Vespa on the stand. Then insert the key and start the instrument cluster. At this point locate the "Mode" button on the right knob and hold it down for a few seconds. Release it as soon as the time on the panel starts flashing and press it several times to change both the hours and minutes digits. At the end, turn off the ignition and you are done. by ScegliAuto More videos
|
|
For advertising on this site Write to info@scegliauto.com
ScegliAuto is not responsible for any inaccuracy of the data in the lists. To report any inaccuracy or your business (if you own the business in question), please write to info@scegliauto.com
Number of seconds to generate the page: 0.044
(c) ScegliAuto 2024 - info@scegliauto.com - Privacy Policy VAT number: IT01247470535 |