
|
Do it yourself
| |||
| ||||


Guide to Replacing the Rear Lights
Model: Fiat Punto
MK 2, 188
- Years 1999-2011
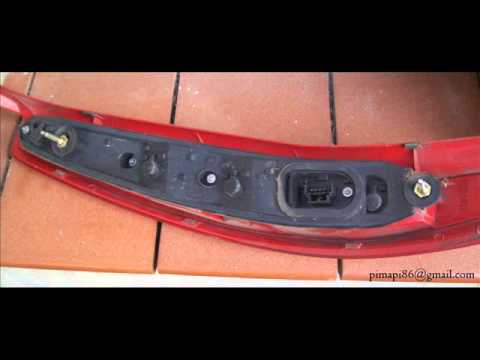
The steps to replace the bulbs in the rear light clusters start with opening the boot lid. Next, to work more easily, remove the parcel shelf.
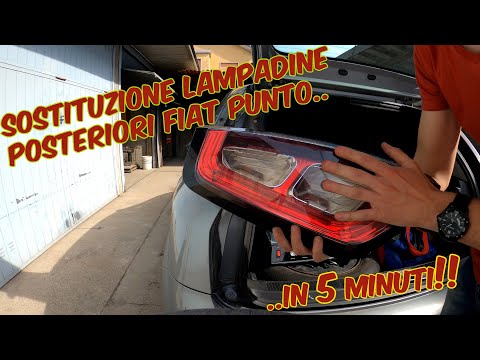
As you can see in the video, you need to remove the cover caps that hide the screws securing the rear pillar trims, which are 17mm hex screws. In the boot, move the trim and unscrew the other bolts. Now you can gently remove the entire rear light cluster and disconnect the power connectors. Using a cross screwdriver, unscrew the screws securing the lens to finally access the bulbs, then replace the faulty ones and reattach the lens. Reinsert the light unit back into its housing, remembering to connect the plugs, and re-screw the securing screws to the bodywork. Thanks to this video, you can repair the lights on your Fiat Punto in under 5 minutes.
Updated on 2 February 2026 by ScegliAuto
Video tutorial
Related tutorials
Fiat Punto
(2005-2018 /
199, MK 3, Grandepunto , Punto EVO)
The video shows how to carry out this simple maintenance operation to replace the lights that illuminate the rear number plate or simply replace them…
Fiat Punto
(1999-2011 /
MK 2, 188)
This guide covers the replacement of the car's rear lights, specifically the rear light bulb. When the corresponding warning light comes on, it means…
Fiat Punto
(2005-2018 /
199, MK 3, Grandepunto , Punto EVO)
In order to replace the Fiat Punto rear light bulbs, lift the tailgate and loosen the screws that will now be accessible, near the gasket. When these…
Other guides you may be interested in
|
Removing the Front Wheel of a Yamaha Tmax
In this video tutorial, you will learn how to remove the front wheel of a Yamaha Tmax 530 (penultimate series). First, remove the fork bolts using a ratchet spanner: then also remove the brake caliper. Now, you will need a stand to lift the front of the bike to safely remove the wheel: then unscrew the central bolt of the wheel: at this point, you can remove it. If desired, you can also remove the mudguard by unscrewing the relevant screws. Apply the reverse procedure for reassembly! by ScegliAuto More videos
|
|
For advertising on this site Write to info@scegliauto.com
ScegliAuto is not responsible for any inaccuracy of the data in the lists. To report any inaccuracy or your business (if you own the business in question), please write to info@scegliauto.com
Number of seconds to generate the page: 0.068
(c) ScegliAuto 2026 - info@scegliauto.com - Privacy policy VAT number: IT01247470535 |