
|
Do it yourself
| |||
| ||||


Hyundai Elantra - Video tutorial
Model: Hyundai Elantra
UD, MK 5, MD
- Years 2010-2015 After opening the boot lid, move the lid corresponding to the rear light concerned and well camouflaged in the side panel of the boot itself. Unscrew the three nuts here and disconnect the connector. Once this is done, you can remove the rear light from the body seat. At this point you can easily access, from behind and therefore from the usually hidden part, to any headlight bulb, be it the low beam, the arrow or the brake light. To do this, it is sufficient to slightly unscrew the rear connector and pull the bulb by extracting it from the same.
Posted on 11 February 2024 by ScegliAuto
 How to replace the rear headlight bulbs in the Hyundai Elantra?
Hyundai Elantra (2010-2015 / UD, MK 5, MD) In this tutorial we can see how to replace the rear headlight bulbs in the Hyundai Elantra, an extremely simple and quick operation. First of all, ma 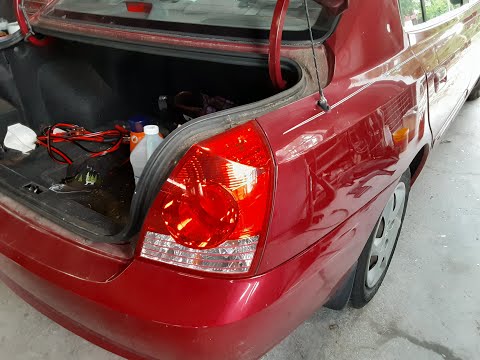 How do you replace the rear headlight bulb of the Hyundai Elantra?
Hyundai Elantra (2000-2006 / MK 3, XD) In order to replace the rear headlight bulb of the Hyundai Elantra, you need to open the rear hatch to access the trunk compartment. Here, you can de  How do you remove the front headlight of the Hyundai Elantra?
Hyundai Elantra (2010-2015 / UD, MK 5, MD) In order to remove the front headlight of the Hyundai Elantra, you need to open the hood so that you can access the screws that secure the headlight Other guides that may interest you
|
How to set the time in the Citroen DS3?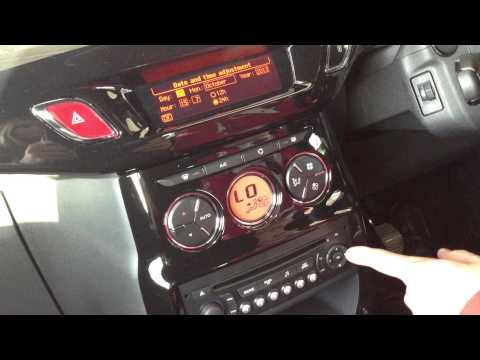
In this tutorial we can see how to set the time in the Citroen DS3, an extremely simple and fast operation, to be carried out for example after being left with the battery on the ground or following the transition to winter and summer time. First of all, turn on the instrument panel, then press the "Menu" button on the center console and enter the settings section. Then select "Display configuration", then "Date and time configuration" and proceed with the time change using the same keys. Once finished, we select "OK" at the bottom left. by ScegliAuto More videos
|
|
For advertising on this site Write to info@scegliauto.com
ScegliAuto is not responsible for any inaccuracy of the data in the lists. To report any inaccuracy or your business (if you own the business in question), please write to info@scegliauto.com
Number of seconds to generate the page: 0.076
(c) ScegliAuto 2024 - info@scegliauto.com - Privacy Policy VAT number: IT01247470535 |