
|
Do it yourself
| |||
| ||||


How to install the sparkling trim on the front emblem of the Mini
Model: Mini Mini
R60, Countryman1
- Years 2010-2016
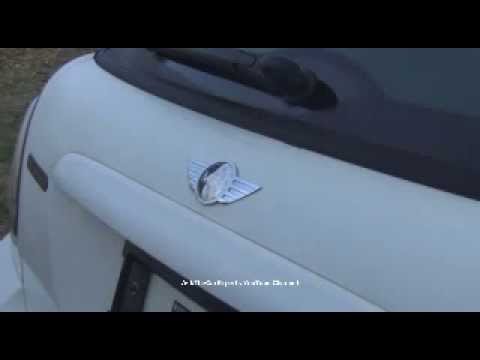
In this video, we want to dedicate ourselves to ladies and girls who want to add a personal touch to their Mini, with a sparkling sticker that outlines the front or rear emblem of their car. We are referring to this sticker, which we have to purchase with shipping from the United States: we can find it on carsoda.com (and there are many other "cool" accessories for our Mini). It is suitable for versions F54; F55; F56; R60; R61. The item costs 36 dollars + 6 dollars for shipping by airmail, and its application is very simple: after carefully cleaning the edges of the emblem and the surface where the frame is to be applied, we remove the double-sided tape and press firmly on the frame to adhere well, and the effect is guaranteed.
Posted on 9 July 2025 by ScegliAuto
Video tutorial
Related tutorials
Mini
(2007-2014 /
R55, R57, R56)
In this video, we see how to replace the damaged Mini emblem on a Mini Cooper. The logo can be easily found on any e-commerce platform, for example o…
Mini
(2001-2007 /
R53, R50, R52)
With exposure to the sun and atmospheric agents, it is very likely that the manufacturer's emblem will deteriorate after some time. If you are going …

Mini
(2010-2016 /
R60, Countryman1)
In this video we can see how to replace the Mini emblem located on the rear trunk handle of the R60 Countryman: we can find it for example on Amazon …
Other guides you may be interested in |
How to Change the Glow Plugs on a Hyundai Santa Fe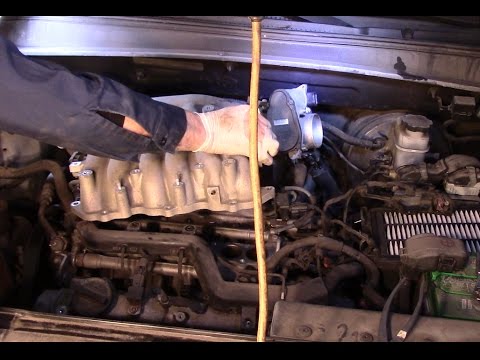
In this video, see how to remove and replace the glow plugs on your Hyundai Santa Fe. Pull the lever to open the engine compartment located at the bottom left of the dashboard, lift the bonnet, and secure it. Follow the video for the tools to use for disassembly. Remove the plastic engine cover and the air filter kit; you will see the engine head bare without plastics. Unscrew the coils using a socket wrench and disconnect the power cables. Once all the coils are removed, unscrew the glow plugs from the head and take them out. To remove the other coils and glow plugs, you need to uncover the metal protection from the head; unscrew these as well and prepare to install the new glow plugs. Be careful not to let any debris fall into the engine head while unscrewing the glow plugs. It is advisable to vacuum the glow plug wells before disassembly. by ScegliAuto More videos
|

|
For advertising on this site Write to info@scegliauto.com
ScegliAuto is not responsible for any inaccuracy of the data in the lists. To report any inaccuracy or your business (if you own the business in question), please write to info@scegliauto.com
Number of seconds to generate the page: 0.047
(c) ScegliAuto 2026 - info@scegliauto.com - Privacy policy VAT number: IT01247470535 |