
|
Do it yourself
| |||
| ||||


Where is the EOBD socket located on the Renault Scenic III?
Model: Renault Scenic
MK III, Scenic III, Scenic 3, MK 3
- Years 2009-2015
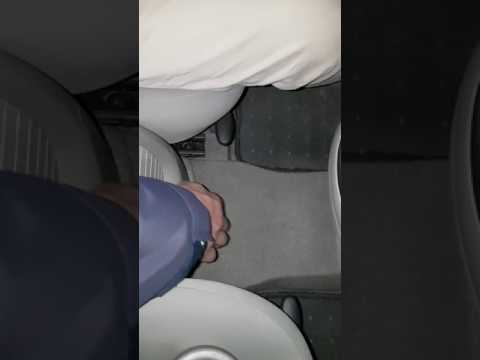
Let's see where the EOBD socket is located on the Renault Scenic III. The EOBD socket (European On Board Diagnostic) is the method through which the technician communicates with the control unit that stores every fault that has occurred within the vehicle. It is also possible for us non-professionals to understand what is happening with our car. In fact, by purchasing an EOBD reader, a device that costs a few tens of euros, we can access the vehicle's control unit and read the error codes that have been stored on it. Then, using any decoding app, we can identify the fault. The EOBD socket on the Megane III is located on the central tunnel. We need to pull back the storage compartment, expose the cup holder, and lift it by turning it to the right. This way, we will discover our socket.
Posted on 4 August 2023 by ScegliAuto
Video tutorial
Related tutorials
Renault Scenic
(2009-2015 /
MK III, Scenic III, Scenic 3, MK 3)
In this video, we can see the location of the EOBD (European On Board Diagnostic) socket on the Renault Scenic III. It is the European version of the…
Renault Scenic
(2003-2009 /
Scenic 2, MK 2)
In this video, we see where to locate the EOBD (European On Board Diagnostic) port of the Renault Scenic version II. This is the way the vehicle comm…

Renault Scenic
(2009-2015 /
MK III, Scenic III, Scenic 3, MK 3)
If you are curious to understand where the OBD port is located inside your Renault Scenic Mk3, then you just need to pay attention to all the steps d…
Other guides you may be interested in
|
Frequently Asked QuestionsHow to Replace the Front Wing of a Renault Clio
First, remove the wheel where the replacement will occur, then lift the vehicle. This will provide easy access to the clips and bolts securing the wing from the inside. Next, remove the bolts located on the underside of the body and any remaining screws. You can now comfortably extract the entire inner part of the wing. To remove the bumper, follow the instructions in the video. To reassemble the wing, simply retrace the steps in reverse. by ScegliAuto More videos
|
|
For advertising on this site Write to info@scegliauto.com
ScegliAuto is not responsible for any inaccuracy of the data in the lists. To report any inaccuracy or your business (if you own the business in question), please write to info@scegliauto.com
Number of seconds to generate the page: 0.050
(c) ScegliAuto 2026 - info@scegliauto.com - Privacy policy VAT number: IT01247470535 |