
|
Do it yourself
| |||
| ||||


Cabin Air Filter Replacement
Model: Saab 9 3
MK 2
- Years 2002-2014
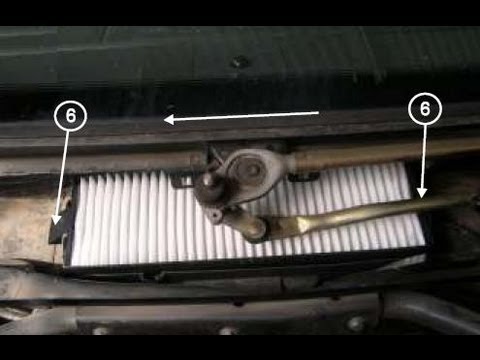
The cabin air filter is located near the right front windscreen wiper. Open the front bonnet and ensure it is securely supported. Between the windscreen and the engine bay, you will notice a plastic cover: the cabin air filter is directly beneath this cover. Remove the retaining clip along the edge of the wing: it is a push-fit clip, and to extract it, press the central plastic pin inwards and then release it. Remove the lip seal and lift the plastic cover: you will immediately see the cabin filter. Extract the old filter and insert the new one, ensuring the airflow direction is correct. Refit the cover and the seal. Before inserting the push-fit clip, pull out the plastic pin to allow the retaining tabs to close: then insert the retaining clip into the designated hole and finally the pin, which will allow the tabs to open and secure the clip.
Updated on 3 February 2026 by ScegliAuto
Video tutorial
Related tutorials
Saab 9 3
(1998-2003 /
MK 1)
The cabin air filter is located in the engine bay, just below the windscreen: to replace it, you need to remove the plastic cover grille situated dir…
Saab 9 3
(1998-2003 /
MK 1)
Cleaning the cabin air filter is absolutely essential to avoid the unpleasant smell often noticed when first turning on the air conditioning. Therefo…
Saab 9 3
(1998-2003 /
MK 1)
How to replace the cabin air pollen filter on Saab 9 3? Let's see in this video how to do the disassembly. Remove with a lever (with a screwdriver if…
Other guides you may be interested in
|
How to Change the Glow Plugs on a Hyundai Santa Fe
In this video, see how to remove and replace the glow plugs on your Hyundai Santa Fe. Pull the lever to open the engine compartment located at the bottom left of the dashboard, lift the bonnet, and secure it. Follow the video for the tools to use for disassembly. Remove the plastic engine cover and the air filter kit; you will see the engine head bare without plastics. Unscrew the coils using a socket wrench and disconnect the power cables. Once all the coils are removed, unscrew the glow plugs from the head and take them out. To remove the other coils and glow plugs, you need to uncover the metal protection from the head; unscrew these as well and prepare to install the new glow plugs. Be careful not to let any debris fall into the engine head while unscrewing the glow plugs. It is advisable to vacuum the glow plug wells before disassembly. by ScegliAuto More videos
|
|
For advertising on this site Write to info@scegliauto.com
ScegliAuto is not responsible for any inaccuracy of the data in the lists. To report any inaccuracy or your business (if you own the business in question), please write to info@scegliauto.com
Number of seconds to generate the page: 0.128
(c) ScegliAuto 2026 - info@scegliauto.com - Privacy policy VAT number: IT01247470535 |