
|
Do it yourself
| |||
| ||||


Toyota Rav 4 - Video tutorial
Model: Toyota Rav 4
MK 4, Xa40
- Years 2013-2018 How to change the blown bulb in the right headlight of the Toyota Rav-4. In reality it is very simple because it is not even necessary to disassemble the optical group. It is accessed directly from the hood. Just open the cap that is located in correspondence with the bulb that we need to change and we will be able to access the bulb of our interest. At this point, just unplug the electrical connector and the lamp holder will come off together with the bulb: remember to never touch the new bulb with your bare hands. At this point replace it and then reinsert it in its housing and close the plastic cap. The work is done.
Posted on 11 September 2022 by ScegliAuto
Other guides that may interest you |
Frequently Asked QuestionsReplace the steering angle sensor on the Volkswagen Golf 5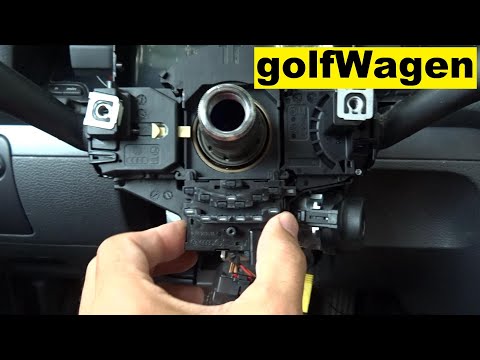
When the steering angle sensor malfunction warning light comes on, it may need to be replaced as follows: first remove the steering wheel and the lower steering wheel guard by removing the three fixing screws. The steering sensor is located just below the steering column. To release it you need to have a small screwdriver and insert it into the hole on the front, push the screwdriver all the way down until the clips at the bottom are released. Next, pull down on the back of the card containing the sensor and disengage it from the steering column. At that point take the new card and reposition it, after which proceed backwards to reassemble the various components. by ScegliAuto More videos
|
|
For advertising on this site Write to info@scegliauto.com
ScegliAuto is not responsible for any inaccuracy of the data in the lists. To report any inaccuracy or your business (if you own the business in question), please write to info@scegliauto.com
Number of seconds to generate the page: 0.025
(c) ScegliAuto 2024 - info@scegliauto.com - Privacy Policy VAT number: IT01247470535 |