
|
Do it yourself
| |||
| ||||


Where is and how to reach the fuse box of a Seat Ibiza?
Model: Seat Ibiza
6P, 6J
- Years 2008-2017
The fuse box of a Seat Ibiza is located on the left side of the dashboard, near the driver's door. To reach it, you must first open the driver's door for better access. Once the door is open, you will notice a plastic cover right at the side end of the dashboard. This cover protects the fuses and can be easily removed with your hands, without the use of specific tools. After removing the cover, you will have direct access to the fuse box. The fuses are arranged neatly and each one has a specific function, so it is advisable to consult the vehicle manual to identify the fuse you want to replace or check. If you need to replace a fuse, make sure to do so with one of the same capacity to avoid electrical problems. Once the operation is complete, you can put the cover back in place and close the door.
Posted on 11 April 2025 by ScegliAuto
Video tutorial
Related tutorials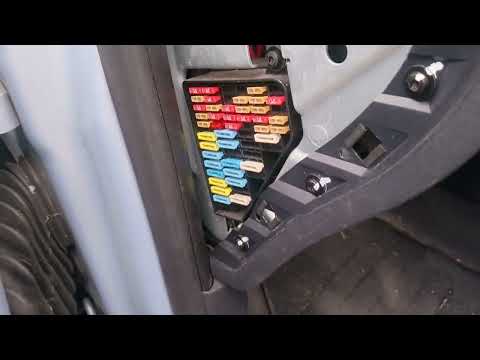
Seat Ibiza
(2008-2017 /
6P, 6J)
In this new mini guide for Seat Ibiza Mk3 owners, you will discover where the fuse box is located. This way, you can safely and accurately address on…

Seat Ibiza
(2008-2017 /
6P, 6J)
This video provides information regarding the fuses of the Seat Ibiza; these are shown on a specific diagram. The fuses of the Seat Ibiza are located…

Seat Ibiza
(2017-2026 /
6F, KJ)
Have you encountered problems with your Seat Ibiza MK5 due to a malfunctioning fuse or fuses? Well, in this brief guide, you can see all the diagrams…
Other guides you may be interested in
|
Frequently Asked QuestionsHow to Connect the Cables to the Battery of the Citroen Xsara Picasso?
In this tutorial, you will see how to connect the cables to the battery of the Citroen Xsara Picasso, useful if you need to recharge it or perform an emergency start. First, ensure the key is not inserted, then open the bonnet and move to the front of the left headlamp. Next, locate the bolt just behind the filter box and connect the positive terminal clamp to it. Now you can connect the negative terminal to any point on the chassis, such as the indicated point. Once the operation is complete, ensure you disconnect the negative first and then the positive. by ScegliAuto More videos
|

|
For advertising on this site Write to info@scegliauto.com
ScegliAuto is not responsible for any inaccuracy of the data in the lists. To report any inaccuracy or your business (if you own the business in question), please write to info@scegliauto.com
Number of seconds to generate the page: 0.907
(c) ScegliAuto 2026 - info@scegliauto.com - Privacy policy VAT number: IT01247470535 |
