
|
Do it yourself
| |||
| ||||


|
This video tutorial shows the installation of new lifters in the cylinder head of a Seat Leon. First, the kit of eight new lifters is displayed in its packaging, which is then carefully opened and the lifters extracted. Before being placed in their housing, a bit of lubricant is applied. In the second part of the video, a new camshaft is also installed. The kit includes instructions and the new camshaft, along with a small bottle of oil specifically for the camshaft; this is poured directly onto the lifters and then spread manually. The camshaft is then positioned and secured with its caps (these should also be pre-greased). Each cap is secured with two bolts, which are tightened using a socket mounted on a ratchet. The camshaft is then secured laterally with a bush and its cover; finally, the timing gears and belt are installed and secured.
Updated on 12 February 2026 by ScegliAuto
Video tutorial
Related tutorials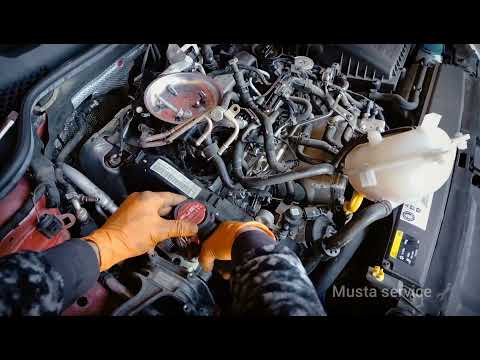
Seat Leon
(2012-2019 /
MK 3, 5F)
The term timing belt refers to a fundamental component of the engine made of elastic material that synchronizes the crankshaft with the camshaft. The…

Seat Leon
(2005-2013 /
1P)
Here is a general procedure for replacing the timing belt: Make sure the engine is completely cold and the vehicle is on a flat and stable surface. R…

Seat Leon
(2012-2019 /
MK 3, 5F)
In order to replace the timing belt of the Seat Leon, you need to lift the car with a jack or a lift, so that you can loosen the bolts that secure th…
Other guides you may be interested in
|
How to Remove the Headlight Bulb on a Honda Civic
Are the front headlight bulbs on your Honda Civic faulty? Follow this instructional video for the disassembly process. Open the bonnet of the engine compartment, remove the inspection caps from the headlights using a screwdriver, detach the bulb holders from the headlight, and disconnect the respective power connectors. Replace the damaged bulbs with new ones of the same size and voltage. After replacing the bulbs, reinstall the bulb holder in the headlight housing. Finally, close the rear of the headlights with the inspection caps. Test the lights to ensure they are functioning correctly. by ScegliAuto More videos
|
|
For advertising on this site Write to info@scegliauto.com
ScegliAuto is not responsible for any inaccuracy of the data in the lists. To report any inaccuracy or your business (if you own the business in question), please write to info@scegliauto.com
Number of seconds to generate the page: 0.047
(c) ScegliAuto 2026 - info@scegliauto.com - Privacy policy VAT number: IT01247470535 |