
|
Do it yourself
| |||
| ||||


Volkswagen - Video guides
Amarok
Arteon
Atlas Terramont
Bora
Caddy
Caravelle
Crafter
Eos
Fox
Golf
ID.Buzz
Jetta
Lavida
Lupo
Maggiolino
Maggiolone
Multivan
New Beetle
Nivus
Passat
Passat Cc
Phaeton
Polo
Routan
Scirocco
Sharan
Spacefox Suran Sportvan Fox Plus
T Roc
T2
Taigo
Taigun
Tayron
Tiguan
Touareg
Touran
Transporter
Virtus Polo Sedan
Ameo
Gol
Id 3
Id 4
Id 5
Id 6
ID.7
Lt
Santana
T Cross
Taos
Up
Volkswagen Various
Vento
Voyage
 Volkswagen Jetta (2010-2018 / ) How to Reset the Tyre Pressure Light on the Volkswagen Jetta? To reset the tyre pressure light on the Volkswagen Jetta, first inflate the tyres to the optimal pressure value: this value will be indicated on the sticker …Read all… Posted on 17 November 2026 by ScegliAuto  Volkswagen T Roc (2017-2025 / ) How to Reset the Tyre Warning Light on the Volkswagen T-Roc? In this tutorial, you will see how to reset the tyre warning light on the Volkswagen T-Roc, an extremely simple and quick operation to perform only once the …Read all… Posted on 17 November 2026 by ScegliAuto  Volkswagen Passat (2014-2023 / ) How to Lower the Headrests on a Volkswagen Passat This guide will explain how to lower the headrests on a Volkswagen Passat B8 model. To adjust the headrest, press the button located at the base of the …Read all… Posted on 17 November 2026 by ScegliAuto  Volkswagen Tiguan (2016-2025 / BW, MK 2, AD) How to Reset the Engine Oil Warning Light (Service) on a Volkswagen Tiguan In a few simple steps, see how to reset the engine oil warning light (service) on a Volkswagen Tiguan. First, get into the vehicle and turn on the dashboard; …Read all… Posted on 17 November 2026 by ScegliAuto  Volkswagen Tiguan (2007-2016 / MK 1, 5N) Diagram and location of the internal fuses of the Volkswagen Tiguan Let’s discover the instructions regarding the diagram and positioning of the internal fuse box of the Volkswagen Tiguan. First, get into the cabin and remove …Read all… Posted on 17 November 2026 by ScegliAuto  Volkswagen Jetta (2010-2018 / MK 6, A6) Dismantling and Replacing the External Door Handle on the Volkswagen Jetta Here are the instructions necessary to dismantle and replace the external door handle on the front door of the Volkswagen Jetta. First, open the front door of …Read all… Posted on 17 November 2026 by ScegliAuto  Volkswagen Caddy (2003-2020 / MK 3, 2K) Guide to Replacing the Timing Belt on a Volkswagen Caddy 1.6 TDI In this guide, discover the main instructions on how to remove and replace the timing belt on a Volkswagen Caddy 1.6 TDI. First, open the vehicle's bonnet and …Read all… Posted on 17 November 2026 by ScegliAuto  Volkswagen Jetta (1998-2005 / MK 4, A4) Location and diagram of the fuse boxes for the Volkswagen Jetta A4 In this section, we see the layout of the fuse boxes for the Volkswagen Jetta A4, while the diagram is clearly shown in the video. The cabin fuse box is …Read all… Posted on 16 November 2026 by ScegliAuto  Volkswagen Golf (2008-2012 / MK 6, Golf6, Golfvi, 5K1) How to Remove the Radiator from a Volkswagen Golf 2.0 TDI Today's main steps will show you how to remove and replace the cooling radiator of the Volkswagen Golf 2.0 TDI. First, open the vehicle's bonnet and begin by …Read all… Posted on 16 November 2026 by ScegliAuto  Volkswagen Golf (2003-2008 / Golf5, Golfv, MK 5) Is the Fuse Diagram for the Volkswagen Golf 5 Plus Available in PDF? To the question at hand, we can only answer yes, the diagram or layout of the fuses used in the Volkswagen Golf 5 Plus is available for download online, also …Read all… Posted on 16 November 2026 by ScegliAuto |
What does the "Code 82" message indicate in the Chevrolet Orlando and how to remove it?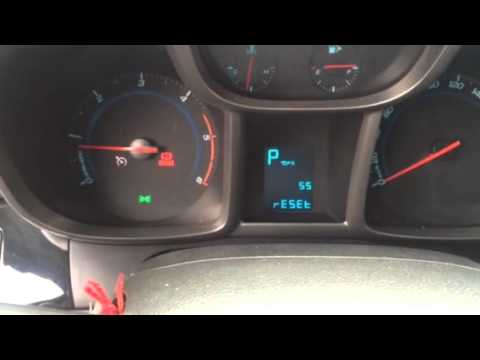
If the "Code 82" message appears on the dashboard of your Chevrolet Orlando, it means that the service interval in miles or time has been reached. Once all scheduled maintenance tasks are completed, you can remove the warning by following the simple procedure shown in this tutorial. First, insert the key and turn on the ignition, then press the "MENU" button located on the left control stalk and navigate to the screen displaying the "Reset" option. At this point, press the "SET/CLR" button at the end of the same stalk and confirm the reset. by ScegliAuto More videos
|
|
For advertising on this site Write to info@scegliauto.com
ScegliAuto is not responsible for any inaccuracy of the data in the lists. To report any inaccuracy or your business (if you own the business in question), please write to info@scegliauto.com
Number of seconds to generate the page: 0.433
(c) ScegliAuto 2026 - info@scegliauto.com - Privacy policy - About us VAT number: IT01247470535 |
