
|
Do it yourself
| |||
| ||||


How to remove the central dashboard of the Alfa 159
Model: Alfa Romeo 159
MK 1
- Years 2005-2011 To remove the dashboard / center console of the Alfa 159 you need to get some hooks that you can build yourself using simple welding electrodes. Begin by removing the shift console with a body builder's lever and disconnecting its electrical connectors. Now unscrew the 2 screws located at the bottom of the dashboard. Using the hooks you have obtained, hook them into the flaps of the ventilation nozzle. To hook them correctly, place one hook in the upper flap and the other in the lower flap. Now, pulling the two hooks at the same time, slide out the air vent and remove it from their seat. Unscrew the Phillips screw located inside the vent housing, taking care not to drop the same screw inside the dashboard. For convenience, use a screwdriver with a magnetic tip. Repeat the same operation on the other nozzle, leaving the central one mounted. Consider that the screws that hold the console are 4. Now, being very careful not to damage it, as it is made of aluminum, pull the console from the seat of the vents. To reassemble the console, position it correctly in its place and by pressing on it, hook it back into its compartment. Next, screw in the 4 screws of the center console; insert the shift console and reconnect the electrical harnesses. Finally, insert the air vents in their seat. Once the work is finished, check that the whole console is perfectly aligned and in harmony with the whole dashboard.
Posted on 3 June 2024 by ScegliAuto
 How to remove the dashboard of an Alfa Romeo 159
Alfa Romeo 159 (2005-2011 / MK 1) Before we can begin, we will have to go and sit in the driver's seat of our Alfa Romeo 159. So let's start by disengaging and removing the three uppe  Where is the fuse box of the Alfa Romeo 159 located?
Alfa Romeo 159 (2005-2011 / MK 1) If you still don't know where the fuse box of your Alfa Romeo 159 is located, you just need to carefully read the following mini guide and put into p 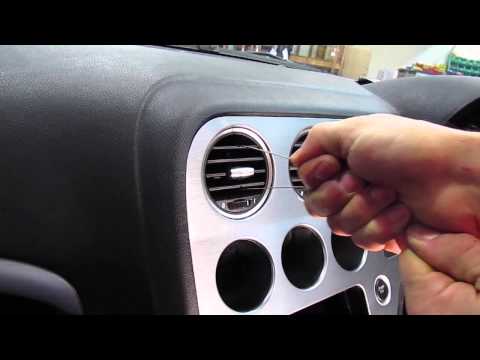 How to remove the air vents on an Alfa Romeo 159
Alfa Romeo 159 (2005-2011 / MK 1) Let's see in this video how to remove the air vents on an Alfa Romeo 159. Let's start by removing the air vents located in the central dashboard with Other guides that may interest you
|
How do you reset the tire pressure light on the Toyota Aygo X?
To reset the tire pressure warning light on the Toyota Aygo X, you need to inflate the tires until they reach the recommended pressure value: this will be indicated on the sticker attached to the driver's side door pillar. Once the tires are inflated, you can go inside the cabin and turn on the instrument panel: after it has been turned on, you can open the glove box on the passenger side and locate the SET button that must be held down to turn off the warning light. by ScegliAuto More videos
|
|
For advertising on this site Write to info@scegliauto.com
ScegliAuto is not responsible for any inaccuracy of the data in the lists. To report any inaccuracy or your business (if you own the business in question), please write to info@scegliauto.com
Number of seconds to generate the page: 0.085
(c) ScegliAuto 2025 - info@scegliauto.com - Privacy Policy VAT number: IT01247470535 |