
|
Do it yourself
| |||
| ||||


How to replace the alternator of the Audi A3 8p
Model: Audi A3
MK 2, 8P
- Years 2003-2013
The guide shows how to replace the alternator of the Audi A3 8p 2.0 Tdi. To do this it is recommended to use an automobile bridge, otherwise it is necessary to remove the right front wheel to have more work space. Once the protection of the wheel arch has been removed, with a 16 mm wrench, loosen the belt tensioner and remove the belt; remove the sleeve located on the bottom of the motor using the two fixing clips. A 13 mm wrench is required to remove the mounting bolts of the air conditioning compressor. To remove the bolt located inside the compartment, it is necessary to detach the engine support and fold the engine downwards. At this point it is possible to remove the two 13 mm bolts located on the external side of the alternator, the 8 mm bolt of the electrical connector and another 13 mm bolt from the internal side of the piece. Remove the alternator and replace it with a new spare part. At this point it is necessary to reassemble all the elements in position and check the correct functioning of the element before taking the road.
Posted on 1 February 2022 by ScegliAuto
Video tutorial
Related tutorials
Audi A3
(2003-2013 /
MK 2, 8P)
Is the alternator of our Audi A3 damaged? Let's see how the piece is removed from inside the engine compartment. We raise the front hood of the engin…

Audi A3
(2003-2013 /
MK 2, 8P)
Today we will see instructions on how to disassemble the alternator of an Audi A3 in its second generation. First we open and lift the bonnet; we rem…

Audi A3
(2012-2019 /
8V, MK 3)
Today we will explain how to replace the alternator on a 2014 Audi A3 car. Before performing the alternator replacement, it is necessary to disconnec…
Other guides you may be interested in
|
Fuse Replacement on Fiat Grande Punto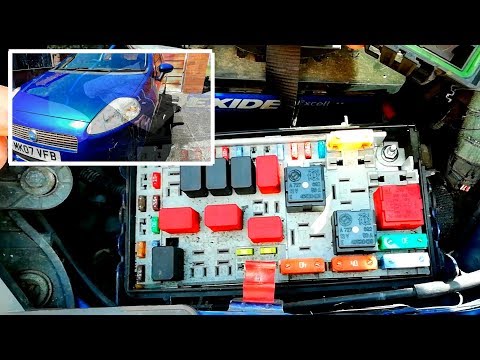
Fuse replacement on the Fiat Grande Punto? Let's see where they are located. Open the door and enter the cabin, then open the glove compartment in the front dashboard (you will find the fuses there). You will also find fuses in the engine compartment: open the front bonnet and remove the cover near the battery using a plastic lever. Use pliers to disconnect the damaged fuses located in the compartment. Once this is done, insert the new fuses into the designated slots in the compartment. Close the fuse inspection box with the cover. by ScegliAuto More videos
|

|
For advertising on this site Write to info@scegliauto.com
ScegliAuto is not responsible for any inaccuracy of the data in the lists. To report any inaccuracy or your business (if you own the business in question), please write to info@scegliauto.com
Number of seconds to generate the page: 0.069
(c) ScegliAuto 2026 - info@scegliauto.com - Privacy policy VAT number: IT01247470535 |