
|
Do it yourself
| |||
| ||||


Fiat Ducato - Video tutorial
Model: Fiat Ducato
X250
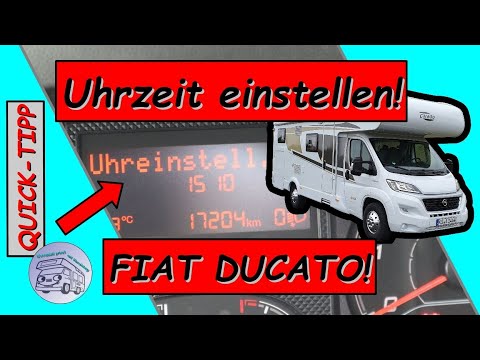
- Years 2006-2014 Today we are going to see a video tutorial that shows us how to set a new time on our Fiat Ducato. To do this, we just need to use the button panel located on the left side of the steering wheel, but let's see the complete procedure right away. First, we turn on the vehicle's instrument panel, then we press the "MODE" button to access the menu on the informative display of the speedometer. Next, we use the arrows next to it to select the "time adjustment" option, and then the "hour" option. Once we have done this, we can proceed to change the time on our car using the "MODE" button and the arrow buttons.
Posted on 2 January 2024 by ScegliAuto
 How do you set the clock on the Fiat Ducato?
Fiat Ducato (2006-2014 / X250) Setting the clock of the Fiat Ducato is done by turning on the instrument panel, rotating the special key inside the ignition switch: once the panel  How to adjust the clock of the Fiat Ducato
Fiat Ducato (2006-2014 / X250) Setting the time on the instrument panel of the Fiat Ducato is a very simple and quick operation, which can be done independently thanks to our short 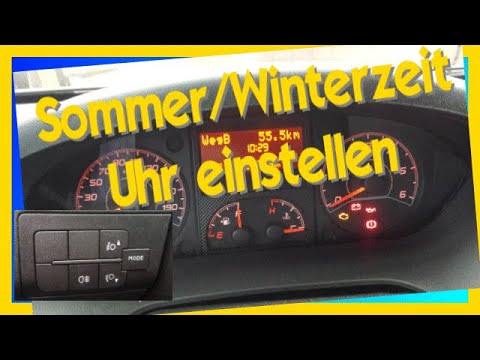 How do you set the Fiat Ducato clock?
Fiat Ducato (2006-2014 / X250) To be able to set the Fiat Ducato clock, turn on the instrument panel so that you can move within the menu that will appear: using the buttons at the Other guides that may interest you
|
Frequently Asked QuestionsHow do you replace the horn on the Citroà «n Berlingo?
In order to replace the horn on the Citroà «n Berlingo, the vehicle must be raised so that the screws that secure the left front wheel can be loosened and removed completely. Once this wheel has been removed, it will be possible to access the screws that secure the internal cover of the corresponding wheel arch: this will have to be detached and it will be possible to access the components inside, including the horn. This will need to be disconnected from its connector and removed from its holders, so that it can be replaced with a new spare part. by ScegliAuto More videos
|
|
For advertising on this site Write to info@scegliauto.com
ScegliAuto is not responsible for any inaccuracy of the data in the lists. To report any inaccuracy or your business (if you own the business in question), please write to info@scegliauto.com
Number of seconds to generate the page: 0.022
(c) ScegliAuto 2024 - info@scegliauto.com - Privacy Policy VAT number: IT01247470535 |