
|
Do it yourself
| |||
| ||||


Disassembly of the dashboard of the Mini Cooper R56
Model: Mini Mini
R55, R57, R56
- Years 2007-2014
In this video we will see the main instructions to remove the dashboard of the Mini Cooper R56, in order to access the motor of the passenger compartment fan. First we go to remove our steering wheel, together with its airbag; to do this we disconnect the electric connector of the latter and then unscrew the central screw of the steering wheel. At this point we remove all the plastics from the dashboard, starting with the disassembly of the glovebox; we use a lever to remove the side plastics and then the central ones. Now unscrew the screws that we find on the dashboard, following the video to the end for the complete disassembly!
Posted on 17 January 2022 by ScegliAuto
Video tutorial
Related tutorials
Mini
(2007-2014 /
R55, R57, R56)
To safely locate the OBD port inside your Mini Cooper R56, you just need to follow the steps described in the following guide addressed to you. First…

Mini
(2007-2014 /
R55, R57, R56)
If you don't know where the OBD port of your Mini Cooper R56 is located, don't worry because thanks to the steps described in the following guide, yo…

Mini
(2007-2014 /
R55, R57, R56)
The engine air filter in your Mini Cooper R56 is a very important component and for this reason you must replace it periodically in order to preserve…
Other guides you may be interested in
|
How to Replace the Rear Door Lock on an Audi A4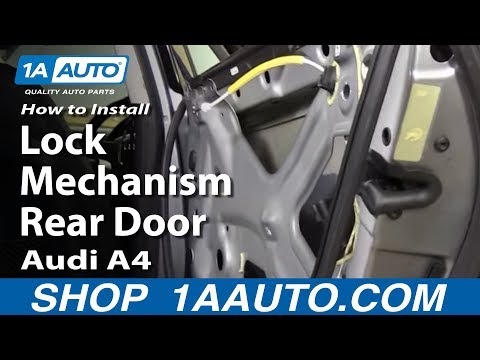
First, disconnect the negative cable from the battery. Now, open the door in question and lift the chrome strip at the top. Then, remove all the screws indicated in the video. You can now lift the door panel by pulling it towards you. Disconnect the connectors at the back and remove the panel. Next, you will need to remove the components shown in the video. Also, detach the weatherstrip around the door and the protective sheet. You will also need to remove the window glass by disconnecting all the connectors and bolts. Then, replace the damaged part and retrace the steps described in reverse. by ScegliAuto More videos
|

|
For advertising on this site Write to info@scegliauto.com
ScegliAuto is not responsible for any inaccuracy of the data in the lists. To report any inaccuracy or your business (if you own the business in question), please write to info@scegliauto.com
Number of seconds to generate the page: 0.097
(c) ScegliAuto 2026 - info@scegliauto.com - Privacy policy VAT number: IT01247470535 |