
|
Do it yourself
| |||
| ||||


Removing and Updating Car Radio Software
Model: Renault Scenic
MK 2, Scenic 2
- Years 2003-2009
To update the software, you need the appropriate jig and the corresponding SD programming card.
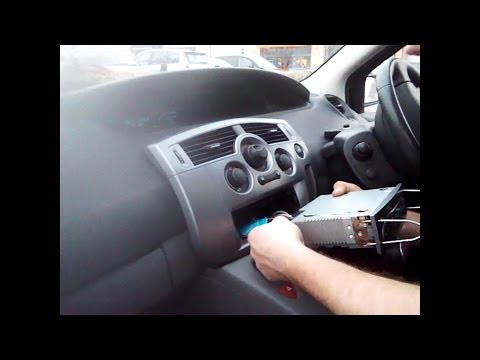
First, remove the car radio from its housing using the supplied tools. At the back of the car radio, there is the appropriate connector for the software update. Open the glove compartment and drill a hole in the left partition to connect with the car radio compartment. The hole must be large enough to pass the jig connector through. Once the hole is made, pass the jig connector through and connect it to the designated connector on the car radio. Refit the car radio, ensuring not to pinch any cables. Place the jig in the glove compartment and insert the SD card into the connector. Turn on the car radio and wait for the new software to load. Do not disconnect the card or turn off the car radio during this process. Once the update is complete, check for proper functionality and new features.
Updated on 2 February 2026 by ScegliAuto
Video tutorial
Related tutorials
Renault Scenic
(2003-2009 /
MK 2, Scenic 2)
Let's see how to enter the car radio code after removing the battery or replacing the stereo on Renault Scenic. Very simple operation: enter the car …
Renault Scenic
(2003-2009 /
MK 2, Scenic 2)
In case of a fault or replacement of the car radio with newer models, proceed as follows. To remove the radio from the console without damaging the b…

Renault Scenic
(2003-2009 /
MK 2, Scenic 2)
Let's see how to update the (original) Tom Tom navigator placed on Renault Scenic. Very simple operation, we enter the car body, turn on the instrume…
Other guides you may be interested in
|
Frequently Asked QuestionsHow to Remove the Headlight Bulbs on a Toyota Rav4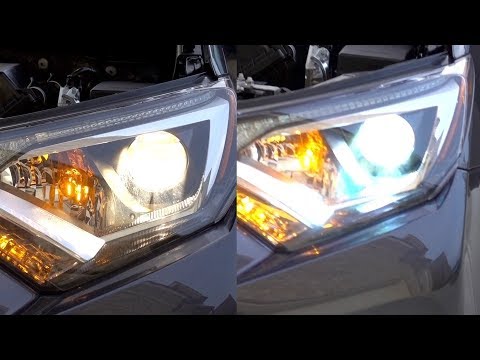
Let's see how to remove the headlight bulbs on a Toyota Rav4. Open the bonnet by pulling the lever located at the bottom right of the dashboard and secure it. Locate the inspection cap (if present) on the headlight and remove it (located at the rear of the headlight). At this point, you will find the bulbs with metal clips; pull the bulb holders out of the headlight and extract the damaged bulb using a screwdriver and pliers. Fit the new bulb (ensuring it is the correct type and size), insert the bulb holder back into the headlight housing, and close the headlight with the inspection cap. Test the lights to ensure they are functioning correctly. by ScegliAuto More videos
|
|
For advertising on this site Write to info@scegliauto.com
ScegliAuto is not responsible for any inaccuracy of the data in the lists. To report any inaccuracy or your business (if you own the business in question), please write to info@scegliauto.com
Number of seconds to generate the page: 0.048
(c) ScegliAuto 2026 - info@scegliauto.com - Privacy policy VAT number: IT01247470535 |