
|
Do it yourself
| |||
| ||||


How to install the rearview camera of the Renault Clio
Model: Renault Clio
Clio 5, Clio V
- Years 2019-2026
To install the rear camera of the Renault Clio, we need to connect the diagnostic socket of the car in order to add the rear camera as an optional feature to the ECU; once the rear camera option has been added, we can start making connections with wires (first testing with the camera not mounted on the bumper, so we don't have to disassemble the car to find wire problems); once we have checked the correct operation with temporary wires, we can secure the rear camera to the rear bumper, connect the camera wire to the reverse light so it turns on when reverse gear is engaged, route the wires through the interior plastics (from above the trunk to the upper internal pillar, then down to the car radio); once everything is connected, we do another test, going to the infotainment system settings, selecting "parking assistants", choosing "rear camera" and checking if it works; then we go back to the main infotainment screen, turn off the car engine, turn on the ignition without starting the engine, engage reverse gear and check if the rear camera turns on. Now that everything is working, we can reassemble the plastics and the bumper previously removed to route the wires.
Posted on 12 June 2024 by ScegliAuto
Video tutorial
Related tutorials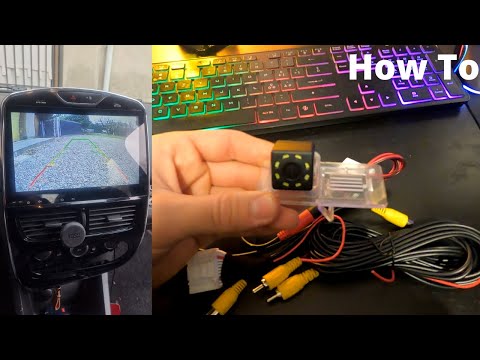
Renault Clio
(2012-2019 /
MK 4, Clio 4, Clio IV)
We can see through this short video guide the necessary steps to install a rear camera kit on a fourth generation Renault Clio, a model in production…

Renault Clio
(2005-2013 /
Clio 3, MK 3, Clio III)
An aftermarket purchase undoubtedly among the most common and useful, in reference to cars, including the Renault Clio 3, is the rearview camera. Wit…

Renault Clio
(2012-2019 /
MK 4, Clio 4, Clio IV)
In order to install the rear camera of the Renault Clio, you need to position it in its housing: this will be located immediately above the license p…
Other guides you may be interested in
|
How to Replace the Gear Knob on a Mini
Want to replace the gear knob on a Mini? Follow these steps for the replacement: first, take the knob in your hands and rotate it left and right until you remove it from the gear stick. Use a plastic lever to disconnect the leather gaiter frame (if it needs replacing). For reassembly: fit the new leather gaiter with the clips (if removed), then take the new knob and push it onto the stick in the centre console until it is secured. Finally, test the movement of the stick in the centre console to ensure the knob is correctly fitted. by ScegliAuto More videos
|
|
For advertising on this site Write to info@scegliauto.com
ScegliAuto is not responsible for any inaccuracy of the data in the lists. To report any inaccuracy or your business (if you own the business in question), please write to info@scegliauto.com
Number of seconds to generate the page: 0.069
(c) ScegliAuto 2026 - info@scegliauto.com - Privacy policy VAT number: IT01247470535 |