
|
Do it yourself
| |||
| ||||


Replacement of the Renault Scenic key battery
Model: Renault Scenic
RX4, MK 1, Scenic 1
- Years 1993-2003
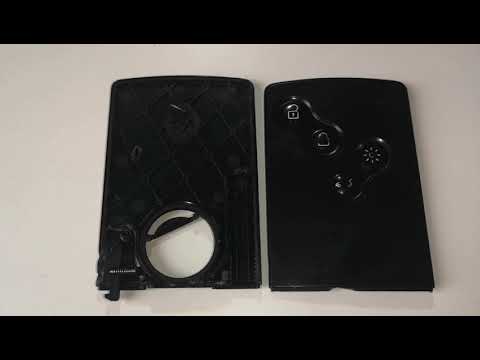
These short and simple instructions will show us how to disassemble and replace the battery of the Renault Scenic key. First of all, take our key and start unscrewing the small screw found on the remote control; then lever on the sides to open the remote control in two parts, thus accessing the electronic board and the battery, as shown in the video. At this point, remove and replace the battery with the new one, of the correct type (in this case a CR 1620 3V); insert the battery in the correct direction and reassemble the electronic board, fixing the two key shells!
Posted on 26 July 2024 by ScegliAuto
Video tutorial
Related tutorials
Renault Scenic
(2016-2022 /
Scenic 4, MK IV, Scenic IV, MK 4)
Removing and then replacing the battery on the card / key of your Renault Scenic is really child's play, and now we will demonstrate it to you. Remov…
Renault Scenic
(2009-2015 /
MK III, MK 3, Scenic III, Scenic 3)
The guide shows how to replace the battery of the Renault Scenic electronic card key. After removing the mechanical key from the remote control, usin…

Renault Scenic
(2009-2015 /
MK III, MK 3, Scenic III, Scenic 3)
The instructions in this guide will show us how to disassemble and replace the battery of the Renault Scenic key remote. First, take our remote contr…
Other guides you may be interested in
|
BMW X1 Battery Replacement
In this video tutorial, you will learn how to remove and replace the battery in a BMW X1. First, lift the hood and locate the battery. Next, use a wrench to remove the air filter hose and disconnect the nearby tubes along with the entire airbox, as shown in the video. Remove the cover bar over the battery by unscrewing all the bolts on both sides. Once removed, disconnect the battery terminals by unscrewing the nuts. At this point, remove the bracket at the bottom that holds it in place by unscrewing the bolt, and then extract the battery! by ScegliAuto More videos
|
|
For advertising on this site Write to info@scegliauto.com
ScegliAuto is not responsible for any inaccuracy of the data in the lists. To report any inaccuracy or your business (if you own the business in question), please write to info@scegliauto.com
Number of seconds to generate the page: 0.135
(c) ScegliAuto 2026 - info@scegliauto.com - Privacy policy VAT number: IT01247470535 |