
|
Do it yourself
| |||
| ||||


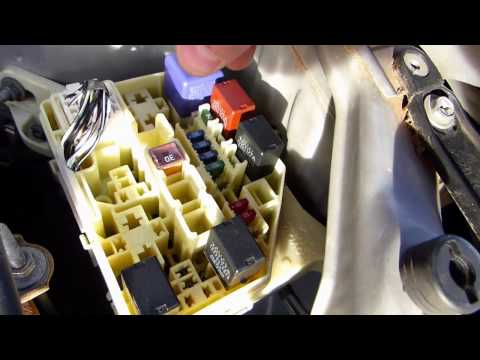
Here is where the internal fuse box of the Toyota Yaris is located.
Model: Toyota Yaris
Xp130
- Years 2011-2019
In the 2016 Toyota Yaris, the internal fuse box is located in the cabin, on the driver's side, at the bottom under the dashboard in the footwell area. To access it, park the car, turn off the ignition, and open the driver's door to have more light and space to maneuver. Locate the small cover/panel at the bottom of the dashboard: it usually has a finger grip or a small notch. Grasp the panel and pull it firmly but without jerking, using a plastic trim removal tool if necessary (it's better to avoid metal screwdrivers to prevent scratching the plastic). Once the cover is removed, you will find the fuse holder with the fuses arranged in a grid, and in many cases, also a fuse extraction tweezers and the legend on the back of the cover or near the panel. If you need to check or replace a fuse, always do so with the ignition off and replace it with one of the same amperage (same color/value). If a fuse blows again immediately, it's safer to stop and look for the cause of the short circuit or overload. For more "sensitive" interventions on the electrical system, disconnecting the negative terminal of the battery is a useful precaution.
Posted on 1 January 2026 by ScegliAuto
Video tutorial
Related tutorials
Toyota Yaris
(1999-2005 /
Xp10)
Are you wondering where the fuses are located on your Toyota Yaris? Let us tell you! The internal fuse box on the Toyota Yaris, model from 1999 to 20…
Toyota Yaris
(1999-2005 /
Xp10)
If you are wondering where the fuses are located in your Toyota Yaris due to a fault, this short video will clarify things. The internal fuse box on …

Toyota Yaris
(2020-2026 /
MK 4)
Below are the instructions that will allow you to access the internal fuse box of the Toyota Yaris, along with the fuse diagram. First, open the fron…
Other guides you may be interested in
|
Frequently Asked QuestionsHow to Connect the Cables to the Battery of the Citroen Xsara Picasso?
In this tutorial, you will see how to connect the cables to the battery of the Citroen Xsara Picasso, useful if you need to recharge it or perform an emergency start. First, ensure the key is not inserted, then open the bonnet and move to the front of the left headlamp. Next, locate the bolt just behind the filter box and connect the positive terminal clamp to it. Now you can connect the negative terminal to any point on the chassis, such as the indicated point. Once the operation is complete, ensure you disconnect the negative first and then the positive. by ScegliAuto More videos
|

|
For advertising on this site Write to info@scegliauto.com
ScegliAuto is not responsible for any inaccuracy of the data in the lists. To report any inaccuracy or your business (if you own the business in question), please write to info@scegliauto.com
Number of seconds to generate the page: 0.831
(c) ScegliAuto 2026 - info@scegliauto.com - Privacy policy VAT number: IT01247470535 |
