
|
Do it yourself
| |||
| ||||


Replacement drums and rear brake shoes
Model: Fiat Brava
MK 1
- Years 1995-2001 First step: lift the car and remove the wheel bolts and the wheel itself. Unscrew the screws of the drum and remove it. With a wire brush attached to the drill, remove dirt and rust inside and outside the drum. Spray the cleaning liquid on the inside of the jaw assembly and remove the sealing springs of the jaws. Remove both jaws from the holder. Spray plenty of cleaning fluid inside the brake. Clean the entire interior of the brake. Unscrew the brake screws and remove all parts. Thoroughly clean all brake components from rust, mud and encrustations to prevent seizure. Prepare the new linings. Clean and grease the moving parts. Carefully reassemble all parts, including the springs in their guides. Secure the pins with the seegers. Refit the remaining springs in their seats. Make sure of the perfect movement of the components. Lubricate the bell well and install it. Install the return springs. Install the brake Cable E. Install the brake lining assembly and install the cable E. Install the remaining parts. Spray more cleaning liquid on the linings and wipe with a rag. Refit the drum and make sure it works correctly by pulling the brake cable. Check the correct operation of the handbrake.
Posted on 18 July 2023 by ScegliAuto
 The importance of cleaning carbon residues from the rear drum of a Hyundai I20
Hyundai I20 (2014-2021 / GB, IB, MK 2) A check that is often overlooked, not only on the Hyundai I20, is the periodic cleaning of the rear drums from carbon residue. This residue, resultin 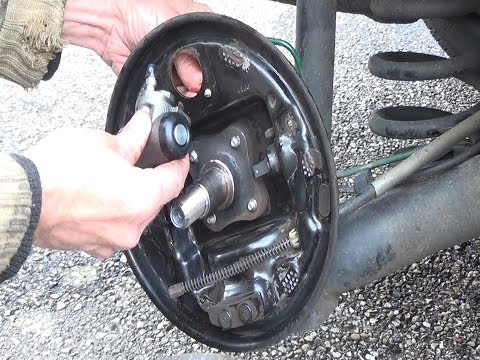 Replacement drums and rear jaws
Renault Clio (1998-2005 / MK 2, Clio 2) In order to replace the drums and the rear shoes it is first of all necessary to lift the car and remove the rear wheel (apply car stands and do not 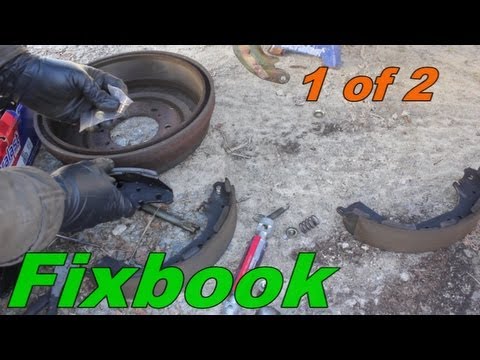 Replacement of rear jaws
Nissan Pathfinder (1986-1995 / MK 1, Wd21) To be able to replace the rear brake shoes, loosen the fixing nuts of the rear wheels before lifting the car; then apply the jack under the different Other guides that may interest you
|
How to remove the telepass holder from the windshield
Today we will explain how to remove the telepass holder from a vehicle's windshield. Removing the telepass holder from the windshield is a very simple and quick operation to perform independently, you just need to use nylon thread that you will need to pull towards the holder and pass it between the holder and the clip. After performing this operation, the holder will be removed. There may be glue residues on the windshield that can be removed with a solvent suitable for glass cleaning. After cleaning everything, it is possible to mount another telepass holder on the windshield in the same position as the one removed or elsewhere. by ScegliAuto More videos
|
|
For advertising on this site Write to info@scegliauto.com
ScegliAuto is not responsible for any inaccuracy of the data in the lists. To report any inaccuracy or your business (if you own the business in question), please write to info@scegliauto.com
Number of seconds to generate the page: 0.304
(c) ScegliAuto 2025 - info@scegliauto.com - Privacy Policy VAT number: IT01247470535 |