
|
Do it yourself
| |||
| ||||


Hyundai Elantra - Video tutorial
Model: Hyundai Elantra
MK 3, XD
- Years 2000-2006 Raise the car and apply suitable car stands. Then remove the wheel and the brake caliper which must be removed together with the pads; also disassemble the caliper support to allow subsequent disassembly of the disc. Then unscrew the disc fixing pin and remove it from the hub. Then install the new disc, reassemble the caliper support and, of course, install a new pair of pads. When replacing discs, the pads must also always be replaced even if they are not completely worn: the old pads now have the imprint of the old disc and would not adhere well to the perfectly ground surface of the new disc; if you really don't want to replace them, they must at least be smoothed out, for example, with sandpaper.
Posted on 11 July 2023 by ScegliAuto
 Replacement of front brake pads and disc grinding
Hyundai Elantra (2000-2006 / MK 3, XD) When replacing the brake pads it is possible to consider the possibility of grinding the discs to make the surface perfectly smooth and eliminate sur  How to replace brake discs
Hyundai Elantra (2000-2006 / MK 3, XD) The guide shows how to replace the brake discs of our car. They are of primary importance for the safety of the driver and passengers. First of all,  Rear wheel hub bearing replacement
Hyundai Elantra (2000-2006 / MK 3, XD) The rear wheel hub bearing is sold complete with the hub itself, therefore the replacement practically consists in the disassembly of the hub; theref Other guides that may interest you |
How to set the time in the Citroen DS3?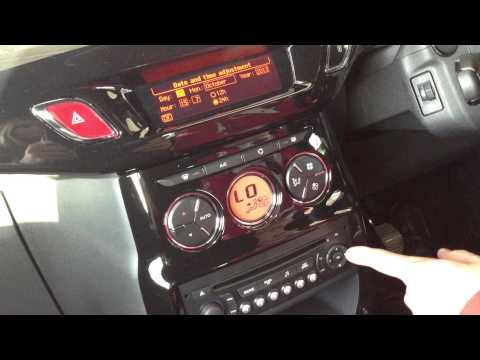
In this tutorial we can see how to set the time in the Citroen DS3, an extremely simple and fast operation, to be carried out for example after being left with the battery on the ground or following the transition to winter and summer time. First of all, turn on the instrument panel, then press the "Menu" button on the center console and enter the settings section. Then select "Display configuration", then "Date and time configuration" and proceed with the time change using the same keys. Once finished, we select "OK" at the bottom left. by ScegliAuto More videos
|
|
For advertising on this site Write to info@scegliauto.com
ScegliAuto is not responsible for any inaccuracy of the data in the lists. To report any inaccuracy or your business (if you own the business in question), please write to info@scegliauto.com
Number of seconds to generate the page: 0.030
(c) ScegliAuto 2024 - info@scegliauto.com - Privacy Policy VAT number: IT01247470535 |