
|
Do it yourself
| |||
| ||||


Installation of Bluetooth Accessory Kit
Model: Kia Cee D
MK 1
- Years 2006-2012
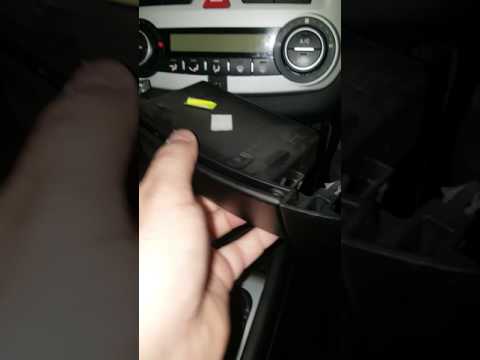
Using a plastic tool to avoid damaging the bodywork, lever on the air vent above the satnav to disengage the plastic clips and remove it to access the console retaining screws. Follow the same procedure on the airbag panel on the side. Remove the plastic trim around the satnav by prising at the edges. Unscrew the console retaining screws and completely remove it. Disconnect the necessary electrical wiring connectors to install the kit. Prepare the cables supplied with the Bluetooth kit, inserting them into the original connectors and connecting the other end to the kit's control unit. Wire the kit according to the attached instructions and secure it inside the dashboard. Refit the cover, passing the cables through the roof pillar to secure the microphone.
Updated on 8 February 2026 by ScegliAuto
Video tutorial
Related tutorials
Kia Cee D
(2006-2012 /
MK 1)
To install the new aftermarket car radio, you first need to remove the original radio; use a plastic lever to disengage the trim around the radio tha…

Kia Cee D
(2018-2024 /
CD, MK 3)
Regarding the Kia Ceed GT, visible in the video here, like many other cars, it is the tire sensors that constantly monitor the inflation pressure of …
Kia Cee D
(2006-2012 /
MK 1)
To remove the ashtray of the Kia Cee'd, you need to use an object like a screwdriver to pry off the two panels on either side of the central dashboar…
Other guides you may be interested in
|
How to Remove the CV Boot on Fiat Panda
Let’s see how to remove the boot from the joint on a Fiat Panda. After positioning your car on a column lift: raise it to a comfortable height to work on, loosen the wheel nuts (using a socket wrench or air drill) and remove the wheel. Begin unscrewing the brake disc bolts with a socket wrench. Remove the bolts located under the disc and completely detach the wheel hub. Pull the arm around the joint with your hands. Fit the new boot (after removing the old one) onto the constant velocity joint, then start reassembling all the parts in reverse order. by ScegliAuto More videos
|

|
For advertising on this site Write to info@scegliauto.com
ScegliAuto is not responsible for any inaccuracy of the data in the lists. To report any inaccuracy or your business (if you own the business in question), please write to info@scegliauto.com
Number of seconds to generate the page: 0.073
(c) ScegliAuto 2026 - info@scegliauto.com - Privacy policy VAT number: IT01247470535 |