
|
Do it yourself
| |||
| ||||


|
The electric sunroof is one of the most elegant accessories to see on a car and is one of the options that make it more luxurious and comfortable. Additionally, one feature not to underestimate is that the sunroof allows for significant fuel savings compared to that required by standard air conditioning systems, as it lets in air directly without the need for other devices. If you decide to install it yourself, all you need to consider is that you will need a specific installation kit, an electric drill, spanners, screwdrivers, pliers, a grinder, and don’t forget safety glasses and durable work gloves. Now, let’s move on to some simple instructions for the installation: the first thing to do is determine whether you prefer an opening panel or a fixed glass panel that only has a panoramic function. Clearly, the latter is simpler to install. If you choose to install a sunroof, you will need to follow a few precautions during the work. After obtaining the appropriate work kit, including the sunroof, position it on the vehicle, having accurately marked where to locate it. Once you have made the drill holes, use a grinder to cut around the edges. At this point, remove the rectangle of metal from the vehicle. Then, fix the protective film strips and the side strips along the edges and insert the deflector. Finally, connect the switch with the wires and check that everything works correctly.
Updated on 22 February 2026 by ScegliAuto
This video is currently unavailable
Related tutorials
Lexus IS
(2013-2024 /
MK 3)
To ensure the replacement of the antenna of the Lexus IS, you will need to pry with an object to detach the interior lining of the roof in the rear: …
Lexus IS
(1998-2005 /
MK 1)
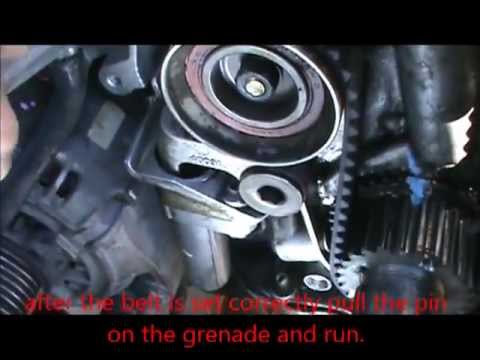
The water pump is driven by the timing belt, therefore it is suggested to carry out this repair only if you have good mechanical knowledge, as a mist…
Other guides you may be interested in
|
How to Remove the Centre Console on a Renault Scenic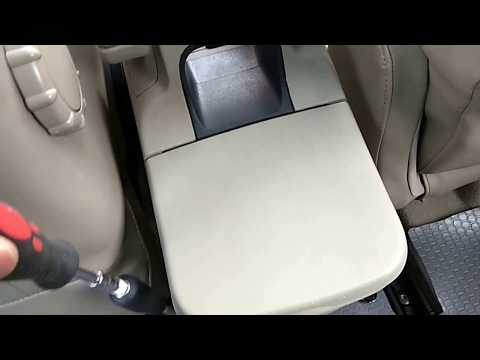
Watch this video to learn how to remove the glove compartment from the rear cover of the centre console on a Renault Scenic. Use a plastic lever to pry at the edge of the side plastics as shown in the video. Once the plastics are removed, unscrew the screws located at the sides of the centre console with a suitable screwdriver, and disconnect all the power connectors. Remove the side rests from the glove compartment. Fit the new piece onto the centre cover and proceed with the assembly of the remaining parts, working in reverse order. by ScegliAuto More videos
|

|
For advertising on this site Write to info@scegliauto.com
ScegliAuto is not responsible for any inaccuracy of the data in the lists. To report any inaccuracy or your business (if you own the business in question), please write to info@scegliauto.com
Number of seconds to generate the page: 0.047
(c) ScegliAuto 2026 - info@scegliauto.com - Privacy policy VAT number: IT01247470535 |