
|
Do it yourself
| |||
| ||||


Mini - Video tutorial
Model: Mini Mini
R56, R55, R57
- Years 2007-2014 To set the time on the Mini Cooper, start by turning on the car's instrument panel without starting the engine. Press the button on the left end of the turn signal lever until the "set/info" message appears. Hold down the same button, then press it again until the clock symbol with the hour appears. Continue holding down the button until a square appears around the hour. Press the same button until you reach the desired hour. Once the hour is set, wait a few seconds for the minutes adjustment (indicated by a square around the minutes). Press the same button until you reach the desired minutes. Once the minutes are set, wait a few seconds for the square around the minutes to disappear and the "set" message to reappear. Now, set the time on the central dial: press the "menu" button, scroll with the dial until you see "config", press the dial to confirm, rotate the dial until you see "time", press the dial to confirm. Press the button just below the "hours" label to adjust the hour, rotate the dial to set the hour, press the button just below the minutes to adjust them as well. If you want to set the date, follow the same procedure with the buttons below the labels "mm" for months, "dd" for days, and "yy" for years. Finally, you can turn off the instrument panel, turn it back on, and check if the settings are saved.
Posted on 23 November 2023 by ScegliAuto
Other guides that may interest you |
Frequently Asked QuestionsHow to reset the error of the VSC warning light and the ABS of the Toyota Rav4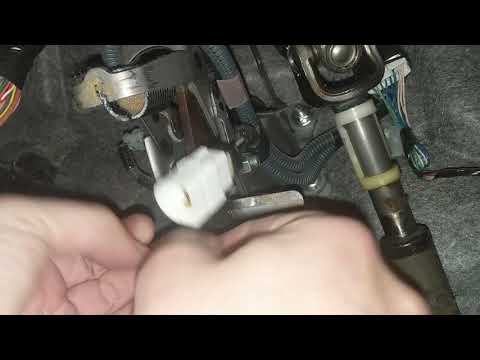
Let's see in this guide how to reset the error of the VSC warning light or the ABS of the Toyota Rav4, analyzing the possible causes. In fact, usually the VSC warning light appears almost always simultaneously with that of the ABS; it indicates a fault in the braking system, in particular in the brake pedal switch located behind the pedal, as shown in the video. Then we get on board the car, on the driver's side, and start by unhooking and removing our switch, disconnecting the electrical connector; then let's reassemble everything, checking that the errors have been cleared from the instrument panel! by ScegliAuto More videos
|
|
For advertising on this site Write to info@scegliauto.com
ScegliAuto is not responsible for any inaccuracy of the data in the lists. To report any inaccuracy or your business (if you own the business in question), please write to info@scegliauto.com
Number of seconds to generate the page: 0.020
(c) ScegliAuto 2024 - info@scegliauto.com - Privacy Policy VAT number: IT01247470535 |