
|
Do it yourself
| |||
| ||||


Skoda Octavia - Video tutorial
Model: Skoda Octavia
MK 2, 1Z
- Years 2004-2012 Disassembly of the headlight of the Skoda Octavia? Do we want to replace the headlight or the bulbs? Let's see the disassembly. We remove the cloth panel that covers the back of the headlight. Once the plastic cover has been removed, let's unscrew the fastening screws of the lighthouse (with a socket wrench). We replace damaged rear light bulbs (bulbs of the same size and voltage, better if quality). We mount the new headlight above the bodywork, fix the inspection cover of the headlight and proceed to check the operation of the previously replaced bulbs. We turn on the lights in the passenger compartment.
Posted on 16 December 2023 by ScegliAuto
 How to replace the rear light bulbs of the Skoda Octavia.
Skoda Octavia (2012-2019 / MK 3, 5E) Today we will discover the instructions that will allow us to disassemble and replace the bulbs of the rear light of the Skoda Octavia. First, we ope  How to replace the rear light on a Skoda Octavia.
Skoda Octavia (2004-2012 / MK 2, 1Z) In this short video tutorial today, we will see how to replace the rear light of a second-generation Skoda Octavia, a model produced from 2004 to 201 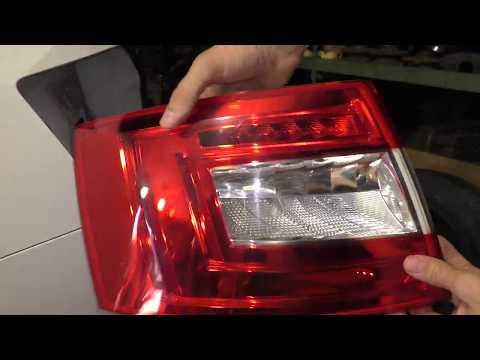 How to change the rear light of a Skoda Octavia
Skoda Octavia (2012-2019 / MK 3, 5E) Do we want to remove the rear light of the Skoda Octavia? Let's see how the headlight is removed from inside the car body. Lift the bonnet of the lug Other guides that may interest you
|
How to adjust the clock of the Citroen C3 2010
This video shows the procedure for adjusting the time and date on the car model described above. On the car's control panel, we first find the Menu key and immediately next to the Ok key, with directional arrows around it, i.e. up, down, right, left. To access the aforementioned adjustment, simply click Menu until we read the word Adjustment on the display, located in the center of the dashboard. To enter this section, click Ok and set the minutes and then the hours with the arrow keys. The same operation, if desired, can be carried out for the day, the month and the year. by ScegliAuto More videos
|
|
For advertising on this site Write to info@scegliauto.com
ScegliAuto is not responsible for any inaccuracy of the data in the lists. To report any inaccuracy or your business (if you own the business in question), please write to info@scegliauto.com
Number of seconds to generate the page: 0.086
(c) ScegliAuto 2024 - info@scegliauto.com - Privacy Policy VAT number: IT01247470535 |