
|
Do it yourself
| |||
| ||||


Battery replacement on Smart Fortwo
Model: Smart Smart
451
- Years 2007-2015
On Smart Fortwo, the battery is located on the passenger side, in the lower area of the passenger compartment. This means that you have to remove the mat and the bottom sheet to be able to see it. Once this is done, start by unscrewing and then disconnecting first the negative pole (the one towards the seat) and only then the positive pole (the one towards the hood). Now unscrew the lateral fixing screws and unscrew the bracket placed above the battery, in order to lift it from the handle by extracting it from its seat. Proceed in reverse to install the battery: insert it, tighten the fixing screws and the bracket and reconnect the poles.
Posted on 15 February 2021 by ScegliAuto
Video tutorial
Related tutorials
Smart
(2007-2015 /
451)
Do we want to remove the battery of the Smart Fortwo? Let's see the disassembly of the damaged battery. We find the Smart battery in the passenger co…

Smart
(2004-2006 /
454, Fourfour1)
Before we begin, we will have to sit in the driver's seat of our Smart ForTwo. In order to be able to carry out this disassembly in complete safety, …

Smart
(1998-2007 /
450)
Let's discover in a few simple steps the process that will allow us to disassemble and replace the gear knob of the Smart Fortwo. First of all, we ge…
Other guides you may be interested in
|
Frequently Asked QuestionsRemoving the Timing Belt on a Suzuki Vitara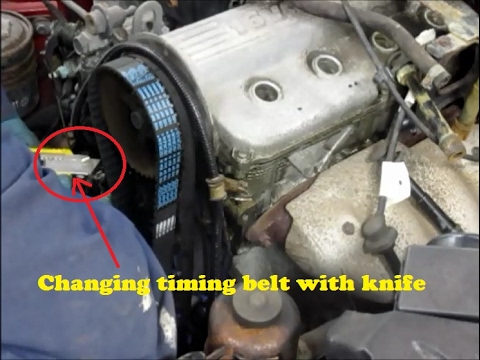
In this video, see the removal and replacement of the timing belt and water pump on a Suzuki Vitara. Open the bonnet and lift it, securing it in place. Use a socket wrench to remove the cooling radiator along with the associated hoses. Disconnect the power wiring using pliers, and remove the plastic undertray with a screwdriver. Use a spanner to loosen the tensioner pulley and slide the belt off its seat. Use a socket wrench to unscrew the tensioner pulley bolt, and remove the water pump as shown in the video. Fit the new water pump, the tensioner, and the belt itself, tightening everything with the socket wrench. Finally, reinstall the radiator with the securing bolts. by ScegliAuto More videos
|

|
For advertising on this site Write to info@scegliauto.com
ScegliAuto is not responsible for any inaccuracy of the data in the lists. To report any inaccuracy or your business (if you own the business in question), please write to info@scegliauto.com
Number of seconds to generate the page: 0.112
(c) ScegliAuto 2026 - info@scegliauto.com - Privacy policy VAT number: IT01247470535 |