
|
Do it yourself
| |||
| ||||


How to replace the bulb in the Tata Nexon.
Model: Tata Nexon
MK 1
- Years 2017-2024 To replace the bulb in the Tata Nexon, follow these steps: Make sure you have the correct replacement bulb for the type of bulb you want to replace. Consult the owner's manual or contact an authorized dealer to identify the correct bulb. Turn off the car and remove the key from the ignition. Make sure the lights are completely off. Open the car's hood and locate the engine compartment. The exact location may vary depending on the model and year of production of the Tata Nexon, but the engine compartment is usually located at the front of the car, behind the front grille. Carefully observe the area where the bulb you want to replace is located. You may need to remove some parts of the vehicle, such as covers or fascia, to access the bulb. Once you have identified the bulb to be replaced, check if there is a connector or wiring holding it in place. You may need to rotate or push the connector to detach it from the bulb. Remove the old bulb, being careful not to break it. You may need to rotate it counterclockwise or slide the mounting bracket to remove it. Take the new bulb and make sure not to touch the glass part with your fingers. Natural oil from the skin can damage the bulb. Insert the new bulb into the mounting bracket or connector. Make sure the new bulb is properly installed and stable. Verify that it is aligned correctly with its mounting position. Reconnect the connector or wiring to the new bulb, making sure it is fully inserted and securely fastened. Verify that the new bulb functions correctly by turning on the car lights and checking if the replaced bulb illuminates properly. If the bulb works correctly, reposition all the parts you removed during the replacement, such as covers or fascia. Close the car's hood.
Posted on 13 February 2024 by ScegliAuto
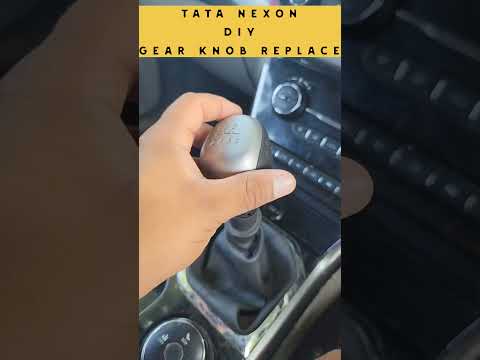 How to replace the gear knob of the Tata Nexon.
Tata Nexon (2017-2024 / MK 1) For the DIY replacement of the gear knob on your Tata Nexon, simply follow the following procedure. First, enter the car, reach the driver's seat, an  How do you replace the battery of the Tata Nexon remote control?
Tata Nexon (2017-2024 / MK 1) In order to replace the battery of the Tata Nexon remote control, you need to press the button on the top of the device so that the key is lifted up.  How to remove the cabin filter in the Tata Nexon?
Tata Nexon (2017-2024 / MK 1) In this tutorial we can see how to remove the cabin filter in the Tata Nexon, a very simple and quick operation, to be carried out in case we need to Other guides that may interest you
|
How to remove the telepass holder from the windshield
Today we will explain how to remove the telepass holder from a vehicle's windshield. Removing the telepass holder from the windshield is a very simple and quick operation to perform independently, you just need to use nylon thread that you will need to pull towards the holder and pass it between the holder and the clip. After performing this operation, the holder will be removed. There may be glue residues on the windshield that can be removed with a solvent suitable for glass cleaning. After cleaning everything, it is possible to mount another telepass holder on the windshield in the same position as the one removed or elsewhere. by ScegliAuto More videos
|
|
For advertising on this site Write to info@scegliauto.com
ScegliAuto is not responsible for any inaccuracy of the data in the lists. To report any inaccuracy or your business (if you own the business in question), please write to info@scegliauto.com
Number of seconds to generate the page: 0.137
(c) ScegliAuto 2025 - info@scegliauto.com - Privacy Policy VAT number: IT01247470535 |