
|
Do it yourself
| |||
| ||||


Toyota Rav 4 - Video tutorial
Model: Toyota Rav 4
MK 4, Xa40
- Years 2013-2018 In order to replace the Toyota Rav 4 headlight bulb, the hood must be opened so that the rear part of the corresponding headlight can be accessed. Here will be the connector, which will need to be disconnected so that the old bulb can be pulled out of its housing. In this way it will be possible to connect the new bulb to the connector and insert it into the special housing in the rear part of the headlight. Once the bulb has been installed, you can close the hood and check that everything is working correctly.
Posted on 16 August 2022 by ScegliAuto
Other guides that may interest you
|
Frequently Asked QuestionsReplace the steering angle sensor on the Volkswagen Golf 5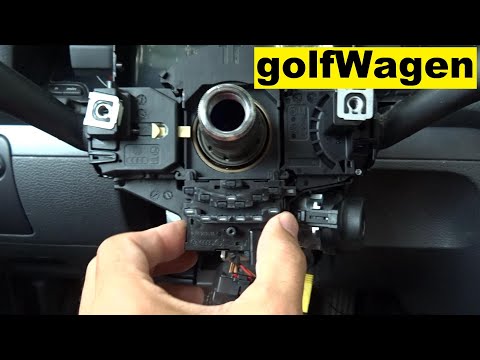
When the steering angle sensor malfunction warning light comes on, it may need to be replaced as follows: first remove the steering wheel and the lower steering wheel guard by removing the three fixing screws. The steering sensor is located just below the steering column. To release it you need to have a small screwdriver and insert it into the hole on the front, push the screwdriver all the way down until the clips at the bottom are released. Next, pull down on the back of the card containing the sensor and disengage it from the steering column. At that point take the new card and reposition it, after which proceed backwards to reassemble the various components. by ScegliAuto More videos
|
|
For advertising on this site Write to info@scegliauto.com
ScegliAuto is not responsible for any inaccuracy of the data in the lists. To report any inaccuracy or your business (if you own the business in question), please write to info@scegliauto.com
Number of seconds to generate the page: 0.059
(c) ScegliAuto 2024 - info@scegliauto.com - Privacy Policy VAT number: IT01247470535 |