
|
Do it yourself
| |||
| ||||


|
Before lifting the vehicle, it is advisable to remove the cover cap of the mounting pins and loosen the bolt at the center of the hub (which is the one securing the axle). Lift the vehicle at the wheel you are working on (possibly using a jack stand) and remove the wheel, brake caliper, and rotor. Then, apply the appropriate puller on which the wheel mounting pins will press to remove the hub. Once the hub is extracted, you will likely find the bearing completely damaged or even broken, and you will need to find a method to extract it from the hub support: in this case, a weld bead has been made on the outer race of the bearing (stuck inside the hub support) to heat it and create a stop to press for extraction. Then, apply the new bearing inside the hub support, insert the hub, and reposition the axle and its securing bolt inside. Finally, reassemble the rotor, brake caliper, and wheel.
Updated on 3 February 2026 by ScegliAuto
Video tutorial
Related tutorials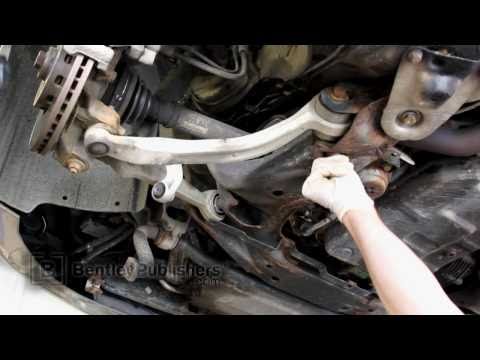
Audi A6
(1997-2004 /
MK 2, C5)
Lift the vehicle on a lift and first remove the bolt securing the stabilizer bar to the suspension control arm. Then remove the nut from the ball joi…

Audi A6
(2004-2012 /
MK 3, C6)
Lift the vehicle on appropriate jack stands and remove the front wheel; disconnect the wear sensor connector, remove the retaining spring, and unscre…

Audi A6
(1997-2004 /
MK 2, C5)
Should we change the rims of the car or replace the tires? Let's see how to remove the wheel on Audi A6. We open the trunk and take the wheel removal…
Other guides you may be interested in
|
How to Remove the Centre Console on a Renault Scenic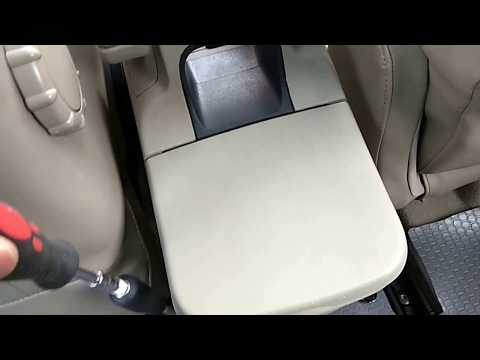
Watch this video to learn how to remove the glove compartment from the rear cover of the centre console on a Renault Scenic. Use a plastic lever to pry at the edge of the side plastics as shown in the video. Once the plastics are removed, unscrew the screws located at the sides of the centre console with a suitable screwdriver, and disconnect all the power connectors. Remove the side rests from the glove compartment. Fit the new piece onto the centre cover and proceed with the assembly of the remaining parts, working in reverse order. by ScegliAuto More videos
|
|
For advertising on this site Write to info@scegliauto.com
ScegliAuto is not responsible for any inaccuracy of the data in the lists. To report any inaccuracy or your business (if you own the business in question), please write to info@scegliauto.com
Number of seconds to generate the page: 0.052
(c) ScegliAuto 2026 - info@scegliauto.com - Privacy policy VAT number: IT01247470535 |