
|
Do it yourself
| |||
| ||||


How to Reset the Service Light on a Dacia Duster
Model: Dacia Duster
HM, MK 2
- Years 2017-2024
In today's video, you will see how to reset the service light on a Dacia Duster; this tutorial also applies to other contemporary models from the Romanian brand. First, turn on the instrument cluster. Now, navigate through the onboard menu using the arrows on the right side until you find the corresponding option. Select it by holding down the upper arrow until the reset request appears. Execute it, and you will be done. It is generally set to 12 months or 15,000 miles. Remember not to skip the recommended service intervals suggested by the manufacturer.
Updated on 25 May 2026 by ScegliAuto
Video tutorial
Related tutorials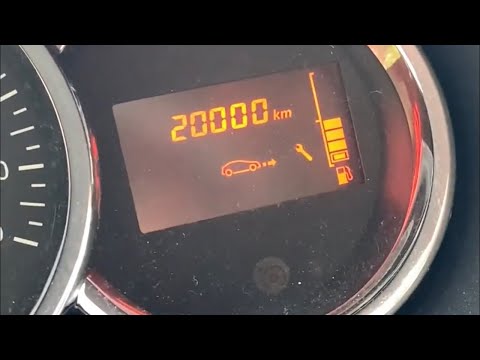
Dacia Duster
(2010-2017 /
HS, MK 1)
Before you can start, sit in the driver's seat of your Dacia Duster. Begin by activating the instrument cluster by simply turning the key in the igni…

Dacia Duster
(2017-2024 /
HM, MK 2)
Today we will see the necessary instructions in order to reset the service light for the regular maintenance of the Dacia Duster. First of all, we ge…

Dacia Duster
(2017-2024 /
HM, MK 2)
Resetting the service light on a Dacia Duster is a straightforward and quick operation. Follow these steps in this tutorial. This procedure should on…
Other guides you may be interested in
|
Frequently Asked QuestionsHow to Open a Stuck Boot on the Peugeot 407?
On the Peugeot 407, the boot may become stuck, possibly due to a problem with the control button or the lock actuator. In such cases, you can perform an emergency opening by following the simple procedure shown in this tutorial. First, open the rear doors, then lower the seat back by operating the release lever. Next, go inside the boot, locate the lock, and manually operate it using a flathead screwdriver. The boot will then be free to open. by ScegliAuto More videos
|
|
For advertising on this site Write to info@scegliauto.com
ScegliAuto is not responsible for any inaccuracy of the data in the lists. To report any inaccuracy or your business (if you own the business in question), please write to info@scegliauto.com
Number of seconds to generate the page: 0.110
(c) ScegliAuto 2026 - info@scegliauto.com - Privacy policy VAT number: IT01247470535 |
