
|
Do it yourself
| |||
| ||||


Fiat Panda - Video tutorial
Model: Fiat Panda
141, MK 1
- Years 1980-2003 Let's see how to disassemble and modify the dashboard lights of the old Fiat Panda: first of all you need to remove the bulbs, remove the part that energizes the bulbs and remove the white plastic part using either a screwdriver or a hair dryer, heating the part and lifting it, as much as It is held only with glue. In this case the green stripe, which would be the one that gives the color to the dashboard bulbs, we remove it and then a strip of a different color is installed. To illuminate the dashboard, two bars of 6 + 6 LEDs of 12v and 3w each are used, which we will place where the two lights were (in the white plastic part). Now to replace the old green stripe, we need to create a transparent or translucent strip to diffuse the light otherwise, without stripe, too much light reaches the bottom of the dashboard, consequently you will see the reflection of the light on the windshield. In this video, an old jar is used to create a strip to replace the green one; using a cutter, first we remove the bottom of the jar, cut one side of the jar vertically in such a way as to always open it with a cutter, putting something underneath so as not to pierce the work surface, we will cut a strip and discard it; now let's take a hair dryer and try to straighten the jar. We take the green bar, place it on the open jar, with a permanent marker, mark the outline of the bar and to cut it we can use a simple scissors, as the material is quite soft. Once the bar has been cut, check if it goes well, if the length is to be changed, modify it and with the hot glue we begin to glue the bar, putting dots of glue on the sides of the bar seat, then position the bar. Now we are going to modify the support of the bulbs where we are going to put the LEDs; we take the LEDs, place it where the previous bulb was and mark where we need to cut, we take an electric cutter and cut along the traced edges. When we have cut the support, we are going to install it on the dashboard and then we will attach the LEDs to the support; to attach everything we can use hot glue because if you have to reassemble it one day it will be easier. With the hot glue we are going to attach, with some glue dots on the sides, the support; glued the support, let's go to attach the leds. Also in this case we can use hot glue, put hot glue dots on the support where the leds will go and glue the leds. Let's test the LEDs by making a wiring using the connectors of the LEDs in the package that will be connected to the machine lighting cables, let's try them by connecting the wiring connectors to the LED connectors by attaching the wiring to a 220-12v transformer and the light looks good and not excessive. Now let's mount everything on the car. Once the dashboard is mounted on the car, we turn on the instrument panel, the lights and we notice that they work and do not bother. The lighting is not reflected in the windshield thanks to the bar we have created and consequently does not bother while driving.
Posted on 18 July 2022 by ScegliAuto
Other guides that may interest you
|
Frequently Asked QuestionsHow to set the time on the Peugeot 308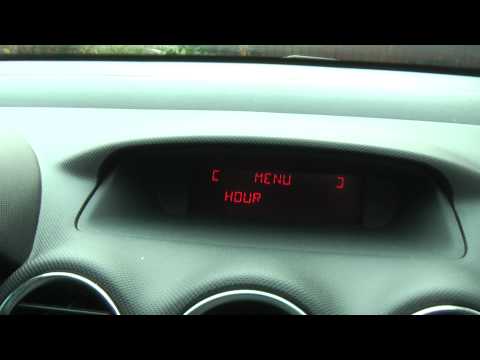
If we need to change the time on this car we can follow the instructions given in this video tutorial and read the instructions below. First of all, access the driver's seat and turn on the ignition. On the right multifunction lever there are the controls with the arrows to scroll the various menu functions and scroll the various functions up to "display adjust", after which press the button behind the lever to change the time, once set the new value press again the key with the arrow indication and modify the minutes in this way the work will be completed. by ScegliAuto More videos
|
|
For advertising on this site Write to info@scegliauto.com
ScegliAuto is not responsible for any inaccuracy of the data in the lists. To report any inaccuracy or your business (if you own the business in question), please write to info@scegliauto.com
Number of seconds to generate the page: 0.030
(c) ScegliAuto 2024 - info@scegliauto.com - Privacy Policy VAT number: IT01247470535 |