
|
Do it yourself
| |||
| ||||


Fiat Punto - Video tutorial
Model: Fiat Punto
188, MK 2
- Years 1999-2011 Before starting to disassemble the actual radiator, we must first drain the coolant. Then open the cap of the expansion tank and the valve on the opposite side as shown in the pictures. Place a container under the car and wear gloves as the liquid could have a certain toxicity. Unscrew the clamp, then detaching the rubber sleeve to let the liquid flow out. Now unscrew the screw under the hood lock. Remove the support bracket and disconnect the electric fan wires. Now unscrew the four screws on the sides of the fan holder. Carefully remove the fan and unclip the upper sleeve as well. At this point all that remains is to detach the radiator, recovering the fixing rubber. Reassemble the new radiator following the same steps in reverse. Car model: FIAT PUNTO Tools required: 10-8mm socket wrenches
Posted on 12 August 2023 by ScegliAuto
 Replacement heating radiator on Fiat Grande Punto
Fiat Punto (2005-2018 / Punto EVO, Grandepunto , MK 3, 199) Is the heating radiator of our Fiat damaged? Let's see the disassembly of the radiator placed inside the Fiat cockpit. We open the door and identify  Replacement of the heater radiator of the Fiat Punto cabin
Fiat Punto (1999-2011 / 188, MK 2) Today we will see the instructions that will allow us to disassemble and replace the heater radiator of the Fiat Punto. In order to access the heater 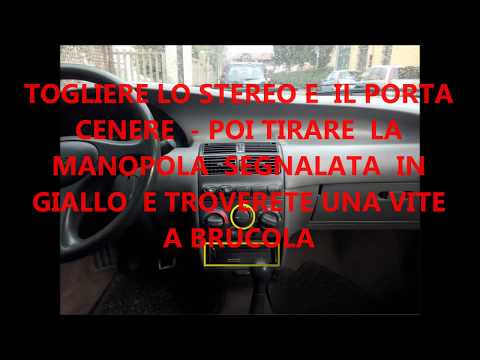 How to remove the heating radiator on Fiat Punto
Fiat Punto (1993-1999 / 176, MK 1) Let's see how to remove the heating radiator on Fiat Punto. First of all: we disassemble the car radio, remove the plastic covering the central tunne Other guides that may interest you
|
Frequently Asked QuestionsHow to set the time in the Citroen DS3?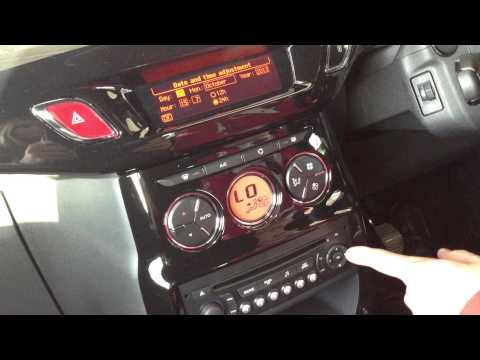
In this tutorial we can see how to set the time in the Citroen DS3, an extremely simple and fast operation, to be carried out for example after being left with the battery on the ground or following the transition to winter and summer time. First of all, turn on the instrument panel, then press the "Menu" button on the center console and enter the settings section. Then select "Display configuration", then "Date and time configuration" and proceed with the time change using the same keys. Once finished, we select "OK" at the bottom left. by ScegliAuto More videos
|
|
For advertising on this site Write to info@scegliauto.com
ScegliAuto is not responsible for any inaccuracy of the data in the lists. To report any inaccuracy or your business (if you own the business in question), please write to info@scegliauto.com
Number of seconds to generate the page: 0.037
(c) ScegliAuto 2024 - info@scegliauto.com - Privacy Policy VAT number: IT01247470535 |