
|
Do it yourself
| |||
| ||||


How do you proceed with replacing the timing belt in the Opel Astra J 1.7 CDTI?
Model: Vauxhall Astra
Astra J
- Years 2009-2016
The Opel Astra J requires the replacement of the timing belt at a certain mileage, strictly following the instructions in the vehicle's owner's manual. After opening the hood, the car is lifted and the right front wheel is removed for easier access. The protective cover is removed, the tensioner is loosened, the belt is removed from its seat and replaced. The next step is to set the timing, which is done by mounting three specific pins in certain holes, namely on the camshaft, the crankshaft, and the injection pump. The exact alignment of these holes determines the successful completion of the job.
Posted on 12 January 2025 by ScegliAuto
Video tutorial
Related tutorials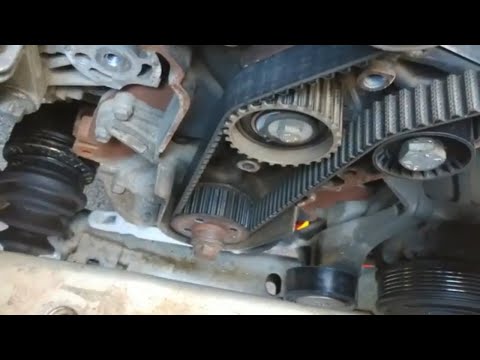
Vauxhall Astra
(2004-2010 /
Astra H)
In this guide, follow the main steps to remove and replace the timing belt on the Opel Astra H 1.9 CDTI, following the instructions below. First, lif…

Vauxhall Astra
(2009-2016 /
Astra J)
In this guide, we will see information regarding the disassembly and replacement of the timing belt of the Opel Astra 2.0 CDTi. On this type of engin…

Vauxhall Astra
(2009-2016 /
Astra J)
The timing belt, just like many other spare parts, is a consumable material and therefore has a predetermined lifespan. At every specified mileage or…
Other guides you may be interested in
|
Frequently Asked QuestionsHow to Open the Bonnet of a Renault Megane if the Lever is Broken?
If the lever that unlocks the bonnet of the Renault Megane is broken or not functioning, there is an emergency procedure to unlock the mechanism: remove the right front grille located at the top of the bumper. Once the grille is removed, you can locate the actuator mechanism: by pulling the spring in this position, you can unlock the actuator, allowing you to lift the bonnet and access the components located inside the engine compartment. You can then close the bonnet simply by lowering it. by ScegliAuto More videos
|
|
For advertising on this site Write to info@scegliauto.com
ScegliAuto is not responsible for any inaccuracy of the data in the lists. To report any inaccuracy or your business (if you own the business in question), please write to info@scegliauto.com
Number of seconds to generate the page: 0.143
(c) ScegliAuto 2026 - info@scegliauto.com - Privacy policy VAT number: IT01247470535 |
