
|
Do it yourself
| |||
| ||||


Peugeot 206 - Video tutorial
Model: Peugeot 206
MK 1
- Years 1998-2012 Let's see how to disassemble the rear shock absorber on Peugeot 206: we loosen the pins of the rim with the appropriate (telescopic wrench or compressed air drill), we lift the car on a column bridge and slide out the rim. With a socket wrench we go to unscrew the locking pins of the shock absorber (in the upper and lower part), lower the car with the column bridge and unscrew the pin on the side in the luggage compartment (if this option is present), remove away the shock absorber from its housing. Let's get ready for assembly: insert the shock absorber in its housing and first tighten all the pins in the upper part of the shock absorber and then fasten the lower part to the wheel hub. Finally we reassemble the circle with the respective pins.
Posted on 23 October 2023 by ScegliAuto
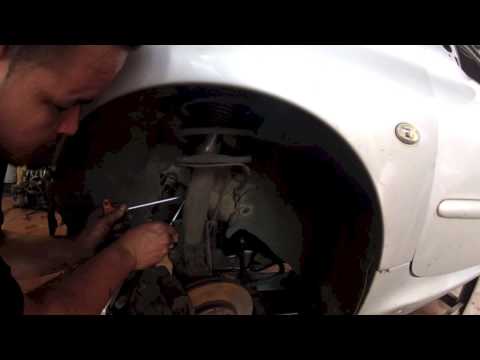 Disassembly of shock absorber complete with hub
Peugeot 206 (1998-2012 / MK 1) Raise the car on a lift and remove the front wheel; then remove the rod end of the steering box and that of the swinging arm of the suspension; disco  Where are the fuse boxes located in the Peugeot 206?
Peugeot 206 (1998-2012 / MK 1) In this video, we can see where the fuse boxes of the Peugeot 206 are located: the one in the cabin is located in the lower part of the dashboard, un  Replacement rear shock absorbers Peugeot 206
Peugeot 206 (1998-2012 / MK 1) In this video tutorial we will see the main instructions to be able to remove and replace the rear suspensions on a Peugeot 206. First of all we lift Other guides that may interest you |
How do you open the fuel flap of the Volkswagen Golf 5?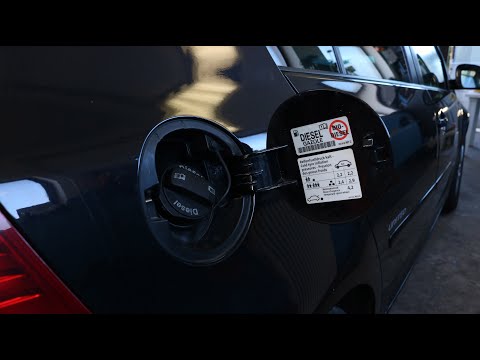
In order to open the fuel flap of the Volkswagen Golf 5, you need to press the appropriate button inside the passenger compartment, which is located in the rear part of the glove box on the driver's door. By pressing the button, the flap will unlock and it will then be possible to open it manually. Once the flap has been opened, the fuel tank access cap must be unscrewed. To close everything again, it will be sufficient to screw the tank cap again; subsequently, the flap must also be closed, pressing it so that it fits thanks to its locking mechanism. by ScegliAuto More videos
|
|
For advertising on this site Write to info@scegliauto.com
ScegliAuto is not responsible for any inaccuracy of the data in the lists. To report any inaccuracy or your business (if you own the business in question), please write to info@scegliauto.com
Number of seconds to generate the page: 0.045
(c) ScegliAuto 2024 - info@scegliauto.com - Privacy Policy VAT number: IT01247470535 |