
|
Do it yourself
| |||
| ||||


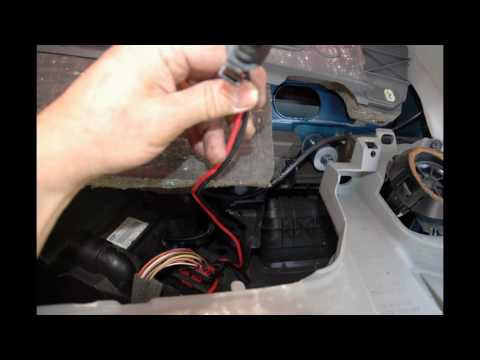
How to replace the heating resistor of a Renault Scenic
Model: Renault Scenic
Scenic 2, MK 2
- Years 2003-2009
This video tutorial shows the procedure to follow in order to replace the heating resistor of a Renault Scenic car. You will need a torx screwdriver, a ratchet wrench with extension, and a new replacement resistor. Start by locating the resistor to be replaced, which is located under the passenger side dashboard, near the fan motor, so you will need to remove the lower dashboard panel. Find the resistor connector and disconnect it; unscrew the fixing screws of the resistor and carefully remove it from its housing. Insert the new resistor, secure it with the appropriate screws, and reconnect the electrical connector. Finally, reassemble the lower dashboard panel.
Posted on 6 September 2025 by ScegliAuto
Video tutorial
Related tutorials
Renault Scenic
(1996-2003 /
)
In today's video, we will see the instructions on how to disassemble and replace the internal cabin heater resistor on a first-generation Renault Sce…

Renault Scenic
(2003-2009 /
Scenic 2, MK 2)
Changing the heating resistor of a Renault Scenic 2 is not that complicated, but it requires a bit of patience and some manual skill. The resistor is…
Renault Scenic
(1996-2003 /
)
How to replace the fan resistor on a Renault Scenic. In this video, learn how to perform the disassembly: use a lever to remove the plastic under the…
Other guides you may be interested in
|
Adjusting the Handbrake on a Ford Ecosport
First, remove the plastic trim at the base of the gear lever. To do this, slightly widen the side edges and carefully lift it to unclip it. There is no need to remove it completely; just move it forward to avoid obstruction. Now remove the central plastic console around the handbrake, starting from the rear to unclip it and lifting it until the handbrake lever passes through. Again, it is not necessary to remove it entirely, but be careful with the connected cables, as it can be placed in front of the passenger seat. At this point, notice that at the base of the handbrake lever, on the front side, there is a nut. By acting on it with a 10mm spanner, you can adjust the handbrake force, increasing it by turning the nut clockwise or decreasing it by turning it anti-clockwise. Once adjusted, you can reposition the central console first by applying slight pressure to clip it back in, and then the trim at the base of the gear lever. by ScegliAuto More videos
|
|
For advertising on this site Write to info@scegliauto.com
ScegliAuto is not responsible for any inaccuracy of the data in the lists. To report any inaccuracy or your business (if you own the business in question), please write to info@scegliauto.com
Number of seconds to generate the page: 0.088
(c) ScegliAuto 2026 - info@scegliauto.com - Privacy policy VAT number: IT01247470535 |