
|
Do it yourself
| |||
| ||||


Replacement of Front Headlamp Bulb
Model: Renault Laguna
X74, Laguna 2, MK 2
- Years 2001-2007
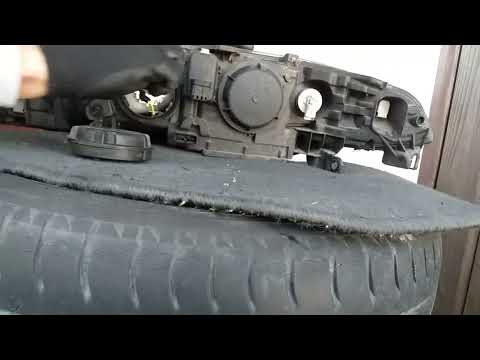
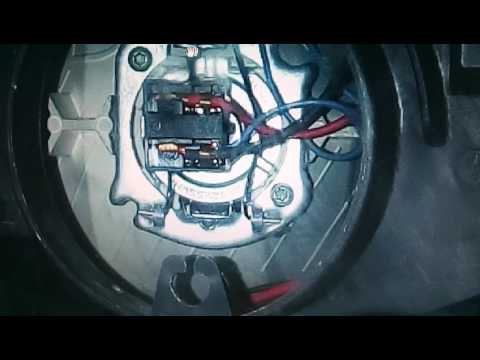
The limited space available for this operation makes the job challenging, so it is necessary to remove the plastic cover located behind the headlamp. The first step is to unclip the retaining spring of the bulb holder by moving it to the left. Carefully remove the bulb holder and to facilitate the operation, completely remove the retaining hook. Unclip the bulb retaining hook and take it out completely, being careful not to drop it. Remove the bulb from the holder. Fit the new bulb into the holder, ensuring it aligns with the reference notch for correct installation. Avoid touching the bulb with your hands. Carefully refit the bulb retaining hook and install the assembly back into the headlamp, checking that the hooks and seal are correctly in place.
Updated on 8 February 2026 by ScegliAuto
Video tutorial
Related tutorials
Renault Laguna
(2007-2015 /
Laguna 3, MK 3, MK III, Laguna III, X91)
Replacing the headlight bulb on the Renault Laguna is done by opening the hood, so that access can be gained to the interior of the headlight corresp…
Renault Laguna
(2001-2007 /
X74, Laguna 2, MK 2)
Replacing the headlight bulb on the Renault Laguna is done by opening the hood of the car, so that you have access to the screws that hold the corres…
Renault Laguna
(2001-2007 /
X74, Laguna 2, MK 2)
Replacing the headlight bulb on the Renault Laguna is done by opening the bonnet, so that you can access the components located in the rear part of t…
Other guides you may be interested in
|
How to Remove the Original Radio from a Renault Trafic
How to remove the original radio from a Renault Trafic? Follow this video closely to perform the removal: use the original or aftermarket metal keys to detach the stereo, insert the keys into the holes on the plastic cover of the stereo, pull the stereo towards you as shown in the video, and extract the radio while being careful of the various wiring (disconnect the power connectors and the antenna cable). Finally, reinstall the original radio or a generic brand with the appropriate adapter for the input and connector. by ScegliAuto More videos
|
|
For advertising on this site Write to info@scegliauto.com
ScegliAuto is not responsible for any inaccuracy of the data in the lists. To report any inaccuracy or your business (if you own the business in question), please write to info@scegliauto.com
Number of seconds to generate the page: 0.045
(c) ScegliAuto 2026 - info@scegliauto.com - Privacy policy VAT number: IT01247470535 |