
|
Do it yourself
| |||
| ||||


Removing the Rear Light of the Seat Leon
Model: Seat Leon
1P
- Years 2005-2013
This guide outlines the steps to remove and replace the rear light of the Seat Leon. First, open the rear hatch of the boot and start unscrewing the two fixing screws located on the side of the light; then open the inner side cover and unscrew the plastic screw of the rear light, as illustrated in the video. At this point, disconnect the electrical connector of the bulbs to remove and replace the rear light with the new one; simply secure it to the bodywork and make the connection!
Updated on 29 June 2026 by ScegliAuto
Video tutorial
Related tutorials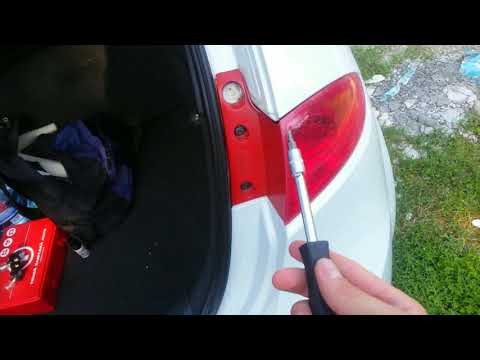
Seat Leon
(2005-2013 /
1P)
To remove the rear light on a Seat Leon, open the boot and remove the fabric cover. Unscrew the plastic screw (remove the bulb holder). Use a screwdr…

Seat Leon
(2012-2019 /
MK 3, 5F)
You can replace the front headlamp on the Seat Leon by opening the bonnet to locate the screws that secure the headlight unit from the top: once the …

Seat Leon
(2005-2013 /
1P)
In order to replace the front headlight cover of the Seat Leon, you first need to loosen the screws that secure the headlight assembly to its housing…
Other guides you may be interested in
|
How to Check the Oil Level on a Jeep Renegade?
To check the oil level on a Jeep Renegade, you need to open the bonnet to access the components inside the engine bay: on the lower left side of the engine block, you will find the dipstick for checking the level. This should be pulled out and thoroughly cleaned with a cloth: once cleaned, reinsert it back into its tube and pull it out immediately after. This way, you can check that the oil mark is between the minimum and maximum levels; finally, you can place the dipstick back in its tube. by ScegliAuto More videos
|
|
For advertising on this site Write to info@scegliauto.com
ScegliAuto is not responsible for any inaccuracy of the data in the lists. To report any inaccuracy or your business (if you own the business in question), please write to info@scegliauto.com
Number of seconds to generate the page: 0.192
(c) ScegliAuto 2026 - info@scegliauto.com - Privacy policy VAT number: IT01247470535 |
