
|
Do it yourself
| |||
| ||||


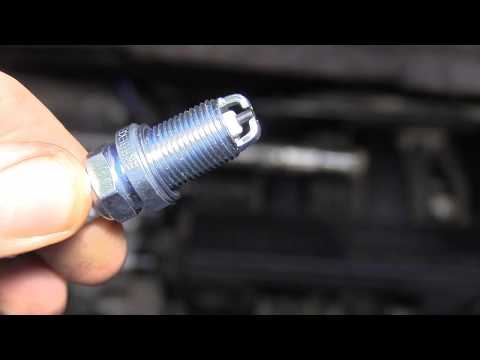
Disassembly of the spark plugs on Smart
Model: Smart Smart
451
- Years 2007-2015
Removing the spark plugs on Smart Fortwo? Let's see how it's done. We open the engine / trunk compartment, lift the engine cover panel as shown in the video. We remove the metal cover of the motor, then, unscrew the locking pins of the coils with a special socket wrench, grasp it with our hands and rotate it in a twist way, until it is extracted from the head. We disassemble the candles and see the damaged ones. We mount the new spark plugs in the cylinder head with the socket wrench. We close the engine compartment with the cover panel. We turn on and check the operation of the engine.
Posted on 16 October 2020 by ScegliAuto
Video tutorial
Related tutorials
Smart
(1998-2007 /
450)
In this video, you will learn how to remove the spark plug caps from a Smart 450. The operation is a bit complicated as these caps are housed within …
Smart
(1998-2007 /
450)
From the boot, access the rear compartment by removing the engine cover, as shown in the video, and locate the position of the spark plugs. Use a soc…

Smart
(2007-2015 /
451)
In this video tutorial we will see how to remove and replace the spark plugs of the engine of a second series Smart Fortwo. First of all, we open the…
Other guides you may be interested in
|
How to Remove the Instrument Cluster on a Citroen Xsara Picasso
How to remove the instrument cluster located in the centre of the dashboard on a Citroen Xsara Picasso? Follow these steps to disassemble the parts: use a lever to remove the plastic covers of the instrument cluster. Unscrew the securing screws located at the sides of the instrument cluster with a screwdriver; after removing the screws, pull the piece out from the dashboard and disconnect the power cable located at the back of the instrument cluster. Fit the new piece or (replace the LEDs/bulbs in the cluster) and reassemble the same. Finally, reverse the assembly steps. by ScegliAuto More videos
|

|
For advertising on this site Write to info@scegliauto.com
ScegliAuto is not responsible for any inaccuracy of the data in the lists. To report any inaccuracy or your business (if you own the business in question), please write to info@scegliauto.com
Number of seconds to generate the page: 0.069
(c) ScegliAuto 2026 - info@scegliauto.com - Privacy policy VAT number: IT01247470535 |