
|
Do it yourself
| |||
| ||||


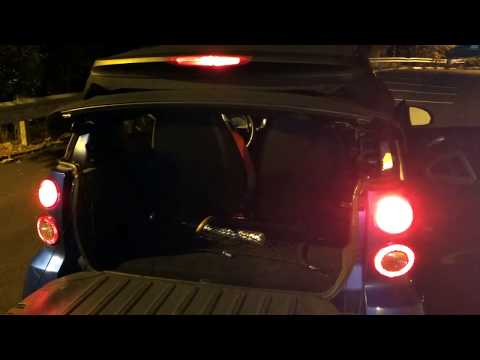
How to remove the rear panels of a Smart 451.
Model: Smart Smart
451
- Years 2007-2015
In this video, we see how to remove the rear panels of a Smart 451: the first thing to do is to remove the screws that hold the lower panel in place. There is a screw near the rear wheel. We unscrew it and lift the panel, which reveals two torx screws: then we unscrew the ones visible on the back. The panels are interlocked, so once unscrewed from the back, we can lift them. However, we have the problem of the fuel cap and the headlights. We start with the trunk lid, unscrewing all the screws we find and disconnecting all the connectors present. We must do the same by moving the body away from the fuel cap. There, we have the solenoid, so we must disconnect it, then we must disconnect all the connections of the rear lights. If we have any doubts, we take photos to make sure we reattach everything in the right place. This way, we have free access to the rear parts of the car (the YouTuber has to work on the lambda probe).
Posted on 20 July 2023 by ScegliAuto
Video tutorial
Related tutorials
Smart
(2007-2015 /
451)
Contrary to what one might think, the removal and installation of the rear window pistons of the Smart 451 are not complex operations. In fact, you c…
Smart
(2007-2015 /
451)
Do we want to replace the damaged bulbs of the Smart Fortwo? Let's see how they remove the rear light of the car from inside. We remove the plastic p…
Smart
(2007-2015 /
451)
In this video tutorial you can see how it is possible to disassemble the rear window of the Smart 451 speedometer, following a few simple steps that …
Other guides you may be interested in
|
How to Fold Down the Rear Seat on a Fiat Tipo
To fold down the rear seat on a Fiat Tipo for extra space in the cabin, first press the lever located on the backrest of the seat, move the seat forward, and rest it on the seat base. Pull the metal lever located at the back of the seat base, grasp the seat, and rotate it forward. Repeat the same operations on the other rear seats of the car, following the previously mentioned manoeuvres. You can load the volume of items you desire based on the space created by folding down the seats. by ScegliAuto More videos
|

|
For advertising on this site Write to info@scegliauto.com
ScegliAuto is not responsible for any inaccuracy of the data in the lists. To report any inaccuracy or your business (if you own the business in question), please write to info@scegliauto.com
Number of seconds to generate the page: 0.074
(c) ScegliAuto 2026 - info@scegliauto.com - Privacy policy VAT number: IT01247470535 |