Volkswagen Polo - Side marker light
Side Marker Light Volkswagen Polo (2009-2017 / 6 r, polo v, mk v, polo 5, mk 5)
Side Marker Light Volkswagen Polo (1994-2003 / 6 n, polo iii, mk iii, polo 3, mk 3)
Cigarette lighter (1)
Airbag (21)
Alternator (8)
Speaker (5)
Shocks (4)
Antenna (9)
Air conditioning (3)
Car stereo (41)
Battery (29)
Ignition coil (6)
Air vents (9)
Control arm (5)
Transmission (5)
Spark plugs (15)
Glow plugs (2)
Body (18)
Glove compartment (7)
Control unit (3)
Key (62)
Trunk lock (2)
Timing belt (55)
V-belt (6)
Air conditioner (7)
A/C controls (1)
Onboard computer (7)
Checks and maintenance (110)
Throttle body (3)
Dashboard (14)
Shifter boot (2)
Bearing (4)
Brake rotors (3)
Side marker light (2)
Headlight (56)
Tail light (22)
Fog lights (20)
Diesel particulate filter (1)
Air filter (42)
Cabin air filter (30)
Fuel filter (5)
Diesel fuel filter (9)
Oil filter (7)
Parking brake (22)
Clutch (1)
Grille (3)
A/C system (1)
Fuel injectors (5)
Window switch (1)
Oil pressure switch (1)
Reverse light switch (1)
Accessory kit (1)
Light bulb (23)
Side marker bulb (4)
Headlight bulb (78)
Tail light bulb (25)
Interior dome light bulb (11)
Antifreeze coolant (2)
Instrument panel light (2)
License plate light (6)
(3)
Handle (13)
Trim cover (1)
Engine (2)
Power window motor (5)
Starter motor (8)
Electric power steering motor (1)
Transmission fluid (1)
Engine oil (17)
Power steering fluid (1)
Clock (64)
Door trim panel (50)
Windshield (1)
Front bumper (14)
Rear bumper (10)
Brake pads (9)
Hydraulic pistons (1)
Shift knob (12)
Pump (11)
Fuel pump (5)
Car door (15)
Push button (5)
Power window switch (3)
Instrument cluster (12)
Radiator (4)
Heater core (6)
Wheel (5)
Fuse box (196)
Seat (20)
Crankshaft position sensor (8)
Engine coolant temperature sensor (3)
Door lock (25)
Brake system (1)
Oxygen sensor (1)
Suspension system (1)
Side mirror (22)
Rearview mirror (2)
Warning light – error code (52)
(1)
Tire pressure warning light (86)
Service warning light (305)
Manufacturer emblem (2)
Brake drums and shoes (2)
Fuel cap (13)
Windshield wipers (19)
Thermostat (7)
Cylinder head (1)
Center console tunnel (3)
Windshield washer nozzle (2)
Valve (1)
EGR valve (6)
Blower motor (15)
Side window (1)
Steering wheel (21)
|
Where is the battery located on the Aprilia Scarabeo 250ie scooter?
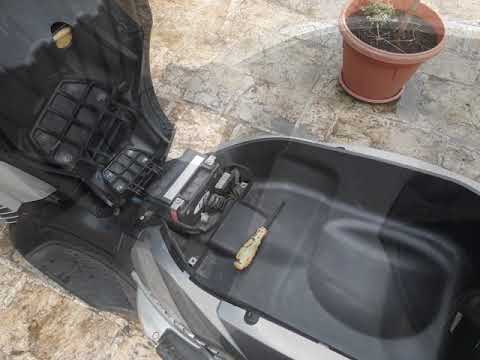
This video shows where the battery is located on the Aprilia Scarabeo 250ie scooter and how to proceed if you need to replace it. As shown, it is located beneath the seat. To access and replace it, first open the seat, then remove the plastic cover by unscrewing the relevant screws with a cross-head screwdriver. Next, disconnect both terminals, starting with the negative, remove the battery from its housing, and install the new replacement following the reverse procedure.
Watch the video!
by ScegliAuto
More videos
|



