
|
Do it yourself
| |||
| ||||


Meaning of error codes: example made on Dodge
Model: Dodge Dodge Various
In this video, we are explained how error codes are encoded: since the codes are closely linked to each brand, in the video we give an example on Dodge: following the OBD2 protocol we divide the car's electrical system into four parts: the first letter of the code identifies the main system of the vehicle, where the failure occurred: P=Powertrain (engine, transmission, and related systems) C=Chassis (frame, brakes, suspension, and steering) B=Body (body, airbags, climate, electronic systems) U=User Network (communication networks between electronic control units). The second character indicates the type of code: it is a digit that specifies if the code is standardized or manufacturer-specific 0 is a generic code; 1 is a manufacturer-specific code 2 is a generic SAE or ISO standard code for Powertrain codes while for Chassis, Body, and Network codes it indicates a manufacturer-specific code: the third character is a digit that identifies the specific subsystem within the main system, and varies depending on the first letter of the code. The fourth and fifth characters specify the exact fault and are digits from 00 to 99 which, combined, provide precise information on the specific fault within the subsystem.
Posted on 13 November 2025 by ScegliAuto
Video tutorial
Related tutorials
Dodge Dodge Various
In the Dodge Dart, it may happen that the fuel door gets stuck, for example due to a problem with the control button or the lock actuator. In this ca…
Dodge Dodge Various
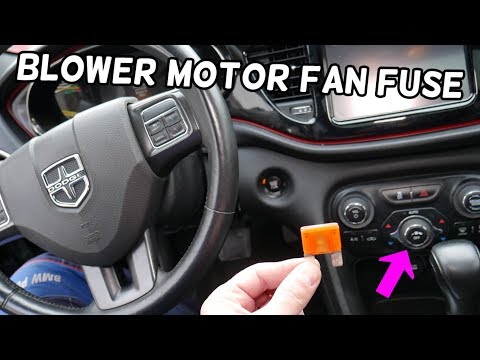
If the interior fan of our Dodge Dart has suddenly stopped working, we can first check the condition of the corresponding fuses, whose location is in…
Dodge Dodge Various
In order to reset the Dodge Journey's on-board computer, you need to insert the key into its lock and it will be necessary to rotate it back and fort…
Other guides you may be interested in
|
How to Dismantle the Heating Radiator on a Mini Cooper
Let’s see how to dismantle the heating radiator on a Mini Cooper. First, remove the plastic cover of the centre tunnel (located under the centre tunnel on the left). Unscrew the securing screws with a screwdriver, and remove the black plastic cover that hides the heating radiator. Once all the described operations are completed, move to the engine bay: remove the plastic engine cover and disconnect the two hoses (unscrew the securing clips if present) of the radiator that goes into the cabin, allowing the fluid to drain. Disconnect the radiator from the pipes inside the cabin. Work in reverse for all the assembly steps. by ScegliAuto More videos
|
|
For advertising on this site Write to info@scegliauto.com
ScegliAuto is not responsible for any inaccuracy of the data in the lists. To report any inaccuracy or your business (if you own the business in question), please write to info@scegliauto.com
Number of seconds to generate the page: 0.094
(c) ScegliAuto 2026 - info@scegliauto.com - Privacy policy VAT number: IT01247470535 |