
|
Do it yourself
| |||
| ||||


Replacing Car Suspension
Model: Fiat Punto
MK 2, 188
- Years 1999-2011
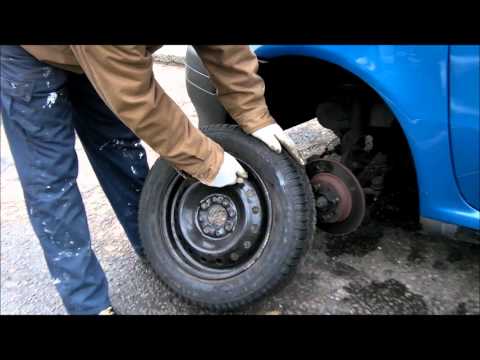
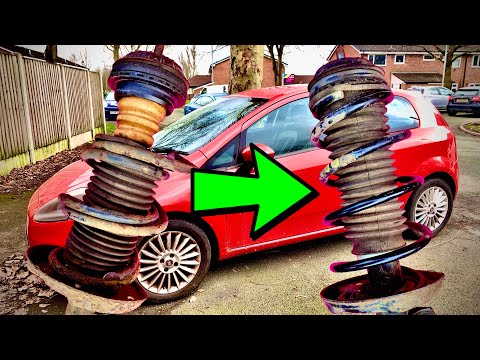
This practical guide shows how to replace your car's suspension. The suspension absorbs the stresses that reach the vehicle through the compression and expansion of gas contained within. Each suspension consists of a sealed rubber spring, utilising compressed air generated by the compressor. Without this, the wheels would detach, losing grip on the road, resulting in a loss of vehicle control. You will need a compressor with a pneumatic gun, a jack, a spring compressor, a ratchet spanner, and a T-bar spanner. The first step is to lift the car using the jack and remove the wheel: engage reverse gear and apply the handbrake. Next, remove the inner wheel arch, which is secured by three plastic nuts; push from the bottom upwards to detach it. Once this is done, the wheel arch will come off easily. Align the vehicle to facilitate removal, then unscrew the bolt holding the shock absorber using the same procedure as for the lower one. Proceed to install the new part: secure the lower part first; it may not align perfectly, but pressing while observing the side will allow you to secure the bolts easily and without complications. For the replacement of the passenger side suspension, follow the same procedure.
Updated on 22 February 2026 by ScegliAuto
Video tutorial
Related tutorials
Fiat Punto
(1999-2011 /
MK 2, 188)
This guide explains how to change your car's wheel bearing without needing to take it to a mechanic, saving you some money. Wheel bearings are spheri…
Fiat Punto
(1993-1999 /
176, MK 1)
Maintaining your car's tyres is important for safety. Having tyres in excellent condition ensures good road grip and significantly reduces replacemen…
Fiat Punto
(2005-2018 /
199, MK 3, Punto EVO, Grandepunto )
In this video tutorial, we will see the main instructions for dismantling and replacing both the front and rear suspensions of the Fiat Grande Punto,…
Other guides you may be interested in
|
How to Disassemble and Remove the Rear Camera of a Mercedes CLA
In this video, see how to disassemble and remove the camera (where the license plate light is located) from the rear hatch of a Mercedes CLA. First, open the rear hatch of the car, then remove the rear license plate. Use a screwdriver to remove the screws on the plastic trim of the hatch. Disconnect the plastic trim of the license plate light from the hatch, and use a screwdriver to remove the retaining clips (located between the hatch metal and the plastic trim). Finally, remove the rear camera located in the hatch (disconnect the power connector of the camera) of the car. For reassembly, proceed in reverse order. by ScegliAuto More videos
|
|
For advertising on this site Write to info@scegliauto.com
ScegliAuto is not responsible for any inaccuracy of the data in the lists. To report any inaccuracy or your business (if you own the business in question), please write to info@scegliauto.com
Number of seconds to generate the page: 0.054
(c) ScegliAuto 2026 - info@scegliauto.com - Privacy policy VAT number: IT01247470535 |