
|
Do it yourself
| |||
| ||||


Installing iPod Adapter and Removing Centre Console
Model: Mazda 6
GH, MK 2
- Years 2008-2012
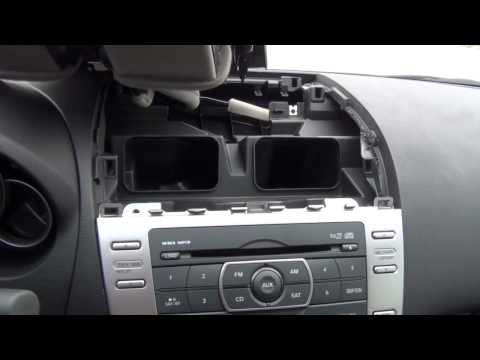
The video shows how to detach the plastic covers along the centre console, specifically the one near the handbrake and the one near the gear lever: both are secured with pressure clips.
First, remove the satellite navigation remote control. Open the glove compartment located to the right of the handbrake and grasp the cover from inside the glove box and from the rear edge just behind the handbrake: pull upwards firmly until it detaches. Unscrew the knob from the gear lever, remove the ashtray, and detach the cover around the gear lever by pulling upwards; then disconnect the plugs connected to the cigar lighter and the navigation remote control contacts. The next step is to remove the car radio, connect the wiring of the iPod adapter kit, and run the cables through the centre console to position the Aux output in the glove compartment if necessary.
Updated on 3 February 2026 by ScegliAuto
This video is currently unavailable
Related tutorials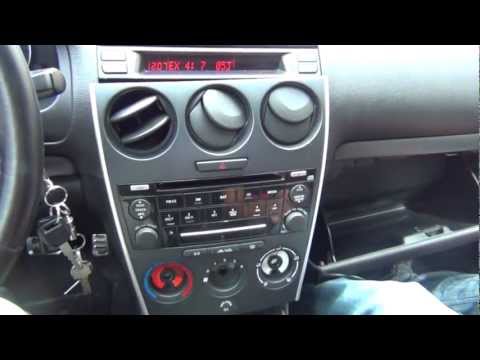
Mazda 6
(2002-2008 /
MK 1, GG)
For this installation, you need a screwdriver and a ratchet spanner with an extension, along with the accessory kit. Start by removing the gear knob …

Mazda 6
(2008-2012 /
GH, MK 2)
If you need to carry out repairs or modifications to the stereo and/or the centre console, this guide will assist you in the disassembly process. Sta…
Mazda 6
(2008-2012 /
GH, MK 2)
To install an Aux input, it is necessary to remove the car radio to which the kit's control unit and the corresponding output cable will be connected…
Other guides you may be interested in
|
How to Replace the Alternator on an Opel Meriva
First, release the bonnet from the lever and lift it. Disconnect the battery to protect your electronic devices. Now locate the alternator position on your vehicle. Remove the belt by unscrewing the tensioner pulley to take it off. You can now remove the bolts securing the alternator. Working on the rear of the alternator, disconnect the cables and pipes attached at the back. This allows you to extract the alternator from your vehicle and carry out the necessary work. by ScegliAuto More videos
|

|
For advertising on this site Write to info@scegliauto.com
ScegliAuto is not responsible for any inaccuracy of the data in the lists. To report any inaccuracy or your business (if you own the business in question), please write to info@scegliauto.com
Number of seconds to generate the page: 0.087
(c) ScegliAuto 2026 - info@scegliauto.com - Privacy policy VAT number: IT01247470535 |