
|
Do it yourself
| |||
| ||||


How to replace the remote control battery of the Mazda Cx3
Model: Mazda Cx 3
MK 1
- Years 2015-2023
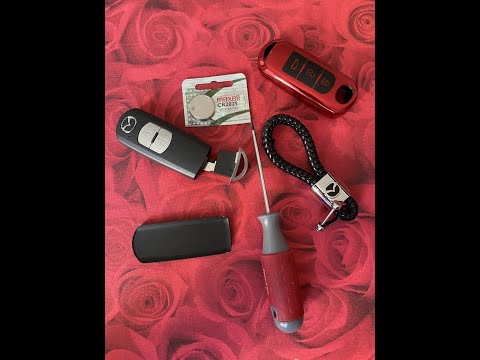
The guide shows how to replace the car's electronic key battery. The first operation to perform is to remove the emergency key from the remote control and, with a screwdriver, pry the side edge to open the device. Remove the plastic cap placed on the battery and replace it with a new one (model CR2025). Reassemble this last piece, paying attention to refit the gasket in contact with the battery and refit the remote control cover. At this point the operation is finished. The tool required for this operation is a split screwdriver. In the absence of this tool, the remote control can also be opened with the emergency key (leaving it inside its housing and turning it).
Posted on 12 January 2022 by ScegliAuto
Video tutorial
Related tutorials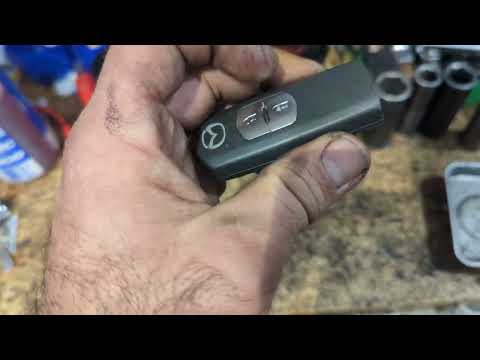
Mazda Cx 3
(2015-2023 /
MK 1)
Replacing the battery in the key of your Mazda CX3 is very simple and thanks to the following dedicated mini guide you will be able to complete the e…
Mazda Cx 3
(2015-2023 /
MK 1)
In this video, the procedure for replacing the battery of the Mazda CX3 key is shown. In order to replace the key battery, you must first remove the …
Mazda Cx 3
(2015-2023 /
MK 1)
Before we are able to start, we will have to sit in the driver's seat of our Mazda CX3, and then activate the instrument cluster. Let's start by sele…
Other guides you may be interested in
|
How to Remove the Grille on a Ford Ranger
In this video, learn how to remove the grille located on the front bumper of a Ford Ranger. Prepare to take off the plastic grille: use a socket spanner to unscrew the fasteners securing the grille (located on the inside of the bumper). With a plastic lever, pry between the grille and the bumper until it disengages from its housing. Once the grille is free, remove it from the bumper and fit a new one. Refit the grille onto the car's bumper by pressing it into place and screw the fasteners back in. Check that all parts are correctly mounted. by ScegliAuto More videos
|
|
For advertising on this site Write to info@scegliauto.com
ScegliAuto is not responsible for any inaccuracy of the data in the lists. To report any inaccuracy or your business (if you own the business in question), please write to info@scegliauto.com
Number of seconds to generate the page: 0.131
(c) ScegliAuto 2026 - info@scegliauto.com - Privacy policy VAT number: IT01247470535 |