
|
Do it yourself
| |||
| ||||


Mini - Video tutorial
Model: Mini Mini
R52, R50, R53
- Years 2001-2007 In this video tutorial, we can see how it is possible to dismantle the ceiling in a Mini Cooper S R53 in less than 4 minutes, following simple steps: the first thing to do is to remove the seal and start loosening the plastic moldings, using bodywork levers, which will be used to loosen the moldings without damaging anything. The door seals must all be removed; then, we need to remove the sun visors, the clock, all the handles, if present also the rear dome light, the panel where the seat belt is located (only loosen it at the top), removing the seal. Collect all the disassembled pieces with their respective screws and place them in a small bowl to avoid losing them, and then reassemble them correctly in their place. The seals are simply reassembled by fitting them together without using any glue. To remove the mirror, simply turn it counterclockwise and then there is a small plastic clip to loosen, otherwise the ceiling cannot be removed. Once we have removed all the parts just described, to remove the ceiling, simply pull it from behind and it will come off. To reassemble, follow the same process in reverse.
Posted on 17 July 2023 by ScegliAuto
Other guides that may interest you
|
Frequently Asked QuestionsHow to replace the Ford Transit key battery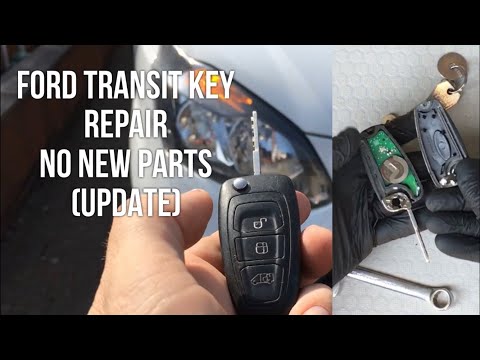
Below I will explain how to replace the remote control key battery on the car, take a small screwdriver and pry the rear part of the remote control, (where there is the ring), at which point unhook the back cover and yes will have access to the compartment containing the battery. Always with the help of the small screwdriver, proceed to make the va and lift the battery out of the housing. Then take the new battery (check the type) and place it on the housing, always making sure to position it with the positive pole facing upwards. Finally, close the back cover by re-hooking it to the key. by ScegliAuto More videos
|
|
For advertising on this site Write to info@scegliauto.com
ScegliAuto is not responsible for any inaccuracy of the data in the lists. To report any inaccuracy or your business (if you own the business in question), please write to info@scegliauto.com
Number of seconds to generate the page: 0.045
(c) ScegliAuto 2024 - info@scegliauto.com - Privacy Policy VAT number: IT01247470535 |