
|
Do it yourself
| |||
| ||||


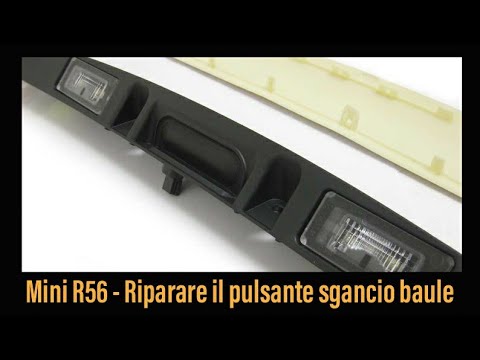
How to repair the trunk button of a Mini R56
Model: Mini Mini
R57, R55, R56
- Years 2007-2014
In this video we see how to repair the broken, or otherwise defective, rear hatch button of a Mini R56. This is a very common issue on this type of car, but we can replace the entire handle, already having the reinforced rubber button, with minimal cost. You can find it on AliExpress with code 60372231512, priced at 36.17 euros, with a shipping cost of 10.57 euros, and you can find it in both black and chrome, according to the color of your car and your preferences. Removing it is very easy, there are only Torx 20 screws to remove, then we will have to disconnect the electric connector that powers the license plate lights and the button. You could take the opportunity to switch to LED lights, if you haven't already: you can find the plates on Amazon with code B01N23LQ8G, priced at 19.99 euros, with free shipping for Prime customers.
Posted on 9 June 2024 by ScegliAuto
Video tutorial
Related tutorials
Mini
(2007-2014 /
R57, R55, R56)
Let's see how to repair the reverse lights of a Mini R56: according to the workshops, the fault was repaired by changing the body computer, with a si…
Mini
(2007-2014 /
R57, R55, R56)
One fault that the Mini often has is the tailgate button, which is often left as it is because it costs too much to change. In this video we will see…

Mini
(2007-2014 /
R57, R55, R56)
Specifically, let's see what the procedure is for turning off the service light in the Mini R56. We are talking about maintenance and servicing, so t…
Other guides you may be interested in
|
Frequently Asked QuestionsHow to Remove the Fuel Pump from a Hyundai IX35
How to remove the fuel pump from a Hyundai IX35. First, disconnect the battery cables, then remove the rear seat from the car. You will find various wiring and a metal piece with screws; that is what you need to dismantle. Undo the screws of the metal cap and remove it. Wrap the entire perimeter of the metal sheet with absorbent paper or cloth, then, with a screwdriver, undo the large bolt around the pump (if present for the model). Disconnect the power connectors and the liquid circulation pipes. Finally, extract the floating fuel pump. To perform the assembly, work in reverse order. by ScegliAuto More videos
|

|
For advertising on this site Write to info@scegliauto.com
ScegliAuto is not responsible for any inaccuracy of the data in the lists. To report any inaccuracy or your business (if you own the business in question), please write to info@scegliauto.com
Number of seconds to generate the page: 0.054
(c) ScegliAuto 2026 - info@scegliauto.com - Privacy policy VAT number: IT01247470535 |