
|
Do it yourself
| |||
| ||||


Repairing the Air Conditioning Display
Model: Saab 9 5
Ys3e, MK 1
- Years 1997-2010
To perform this repair operation, it may be useful to use a type of capacitor as a filter. Of course, you must work to maintain the correct polarity between the electrodes, otherwise, you risk damaging everything. To repair the computer that controls the air conditioning, the first step is to remove it from the slot where it is housed and disconnect the wiring harnesses that connect it to the car. Then, remove the 4 screws on the back with a flathead screwdriver. Once the screws are removed, you can extract the board and circuit to work on it. Once the pins have been soldered, you should be able to pull out the capacitor from the front using stiff wire, allowing you to insert the new capacitor. This way, everything will be back to functioning correctly. To reassemble, simply perform the operation in reverse order to disassembly.
Updated on 10 February 2026 by ScegliAuto
This video is currently unavailable
Related tutorials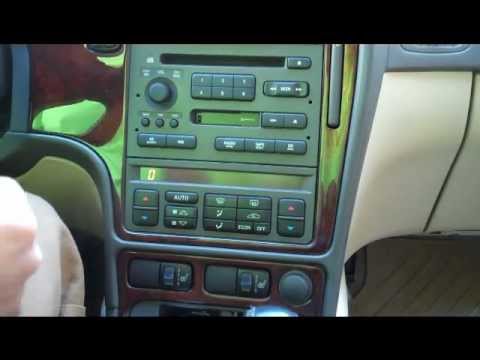
Saab 9 5
(1997-2010 /
Ys3e, MK 1)
By pressing the AUTO and OFF buttons on the climate control simultaneously, you can receive a response regarding the climate control fault code (this…

Saab 9 5
(1997-2010 /
Ys3e, MK 1)
First, remove the door panel by taking off the seal along the door pillar; then unscrew the panel fixing screws, release the clips, and disconnect th…

Saab 9 5
(1997-2010 /
Ys3e, MK 1)
Open the front bonnet and ensure it is securely supported. Then, detach the front trim from the bumper by pulling it forward; similarly, unclip the s…
Other guides you may be interested in
|
How to Replace the Remote Battery for the Volvo XC40?
In this tutorial, you will see how to replace the battery in the remote for the Volvo XC40, a very simple and quick operation. For this, you will need a replacement battery of type CR2032 and possibly a small flathead screwdriver. First, remove the front cover by pressing the button on the metal ring, then locate the second button, press it as well, and remove the opposite cover. Next, open the circular cap, take out the old battery, and insert the new one in the opposite direction. Finally, reassemble everything. by ScegliAuto More videos
|
|
For advertising on this site Write to info@scegliauto.com
ScegliAuto is not responsible for any inaccuracy of the data in the lists. To report any inaccuracy or your business (if you own the business in question), please write to info@scegliauto.com
Number of seconds to generate the page: 0.188
(c) ScegliAuto 2026 - info@scegliauto.com - Privacy policy VAT number: IT01247470535 |
