
|
Do it yourself
| |||
| ||||


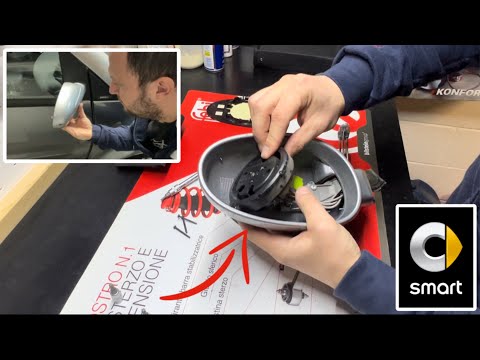
How to repair the rear view mirror on the Smart Fortwo
Model: Smart Smart
450
- Years 1998-2007
In this video tutorial we can see how to repair the rear view mirror of the Smart Fortwo, if the cap is broken or it no longer makes the movement it should do, in this case it will be possible to reuse our cap, just taking the piece inside. Once the mirror of the Smart has been disassembled, we see that there are about 4 screws, which are used to screw onto the door of the car; so to unscrew them we take a 20 torx key; once the screws have been unscrewed, we find another piece that is used to move the car mirror; then remove the rubber cap; once pulled away we find a nut that must be unscrewed, otherwise the strings remain attached to the door; we remove it and the mirror comes off. Once the mirror has been detached from the car, the mirror must be removed and the mirror must be levered with a screwdriver to remove the mirror. Now take a torx and unscrew the two internal screws that are attached to the internal iron mechanism, until the cap is held, once the screws have been removed we must take a 8 torx and remove the other screws. Replace only the parts that no longer work and reuse other parts that still work.
Posted on 25 February 2023 by ScegliAuto
Video tutorial
Related tutorials
Smart
(2007-2015 /
451)
Today's instructions will show us how to disassemble and replace the external rearview mirror of the Smart Fortwo. First, we open the front door and …
Smart
(1998-2007 /
450)
In this video tutorial we can see how it is possible to remove the external rear view mirror in a Smart Fortwo 450 by following a few simple steps: f…
Smart
(1998-2007 /
450)
In this video tutorial we will see how to disassemble and replace the interior rear view mirror of a Smart Fortwo 450, in the simple steps illustrate…
Other guides you may be interested in
|
How to Remove the Dome Light of an Audi Q5
Let's see how to remove and replace the bulbs located in the dome light of the headliner on an Audi Q5. Use a screwdriver or a plastic trim tool to pry between the dome light cover and its perimeter (without breaking the plastic). Pull the bulbs to be replaced out of the dome light. Replace the damaged bulbs with new ones (same size and voltage). Reinstall the cover in its housing along with the associated parts. Perform the same operation for the other dome lights located in the headliner. Test the light's proper operation at the end of the installation. by ScegliAuto More videos
|
|
For advertising on this site Write to info@scegliauto.com
ScegliAuto is not responsible for any inaccuracy of the data in the lists. To report any inaccuracy or your business (if you own the business in question), please write to info@scegliauto.com
Number of seconds to generate the page: 0.110
(c) ScegliAuto 2026 - info@scegliauto.com - Privacy policy VAT number: IT01247470535 |