
|
Do it yourself
| |||
| ||||


How to replace the stop switch of the Smart Fortwo.
Model: Smart Smart
451
- Years 2007-2015
Below we will see the steps that will allow us to disassemble and replace the rear brake switch of the Smart Fortwo, following the instructions below. First, lift the car and start unscrewing the screws that secure the plastic cover located under the engine; then remove the cover that will allow us to access the stop switch, as shown in the video. At this point, disconnect the electrical connector to remove and replace the stop switch with the new original one, applying the reverse procedure for reassembly!
Posted on 1 February 2024 by ScegliAuto
Video tutorial
Related tutorials
Smart
(2014-2022 /
453)
In this tutorial we can see the fuse assignment diagrams for a Smart Fortwo car. The fuse box diagram inside the vehicle cabin has fuses assigned to:…

Smart
(2007-2015 /
451)
If the Smart Fortwo does not start, the most common problem is related to the crankshaft rpm sensor. This is because the sensor mounted on the cranks…

Smart
(2004-2006 /
454, Fourfour1)
Before we begin, we will have to sit in the driver's seat of our Smart ForTwo. In order to be able to carry out this disassembly in complete safety, …
Other guides you may be interested in
|
Frequently Asked QuestionsReplacing the External Mirror of a Volkswagen Golf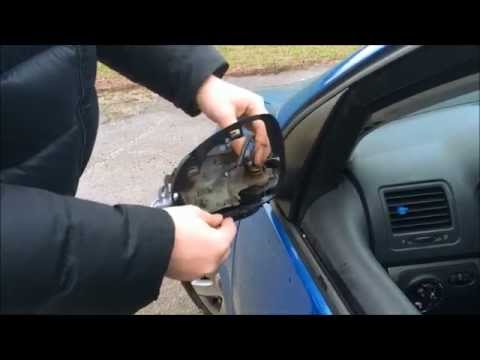
How to replace the external mirror of a Volkswagen Golf? Follow this video to proceed. Using a plastic or rubber lever, pry between the perimeter of the mirror frame and the mirror glass. Pry until the glass detaches from the mirror; this is a delicate operation as the glass or the mirror itself may break. Once the damaged mirror is removed, unscrew the round plastic plate with a screwdriver, and replace it with the new one. Ensure the plastic clips engage in the mirror supports. Use the same procedure to remove the indicator. by ScegliAuto More videos
|

|
For advertising on this site Write to info@scegliauto.com
ScegliAuto is not responsible for any inaccuracy of the data in the lists. To report any inaccuracy or your business (if you own the business in question), please write to info@scegliauto.com
Number of seconds to generate the page: 0.059
(c) ScegliAuto 2026 - info@scegliauto.com - Privacy policy VAT number: IT01247470535 |